Code your first game: Snake in JavaScript (on Raspberry Pi)

Andy Balaam from Andy Balaam's Blog

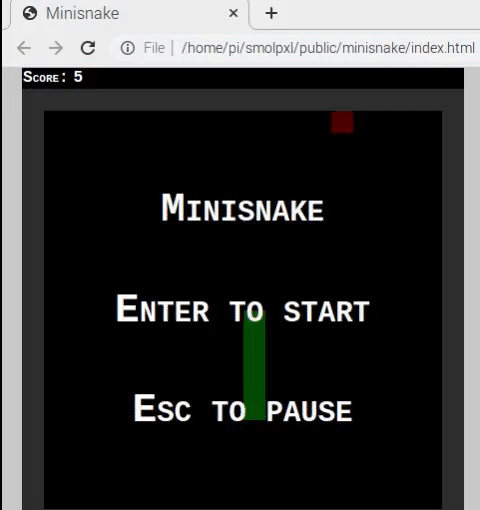
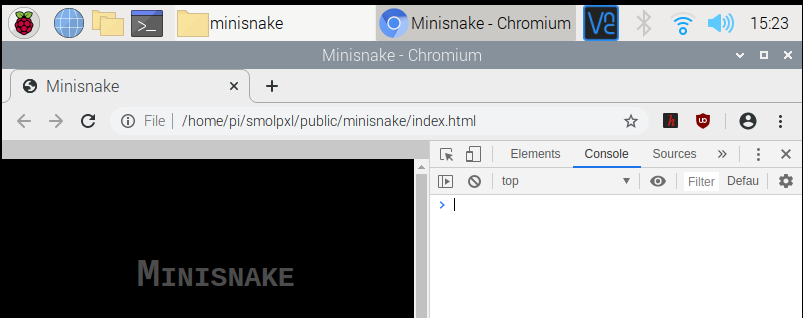
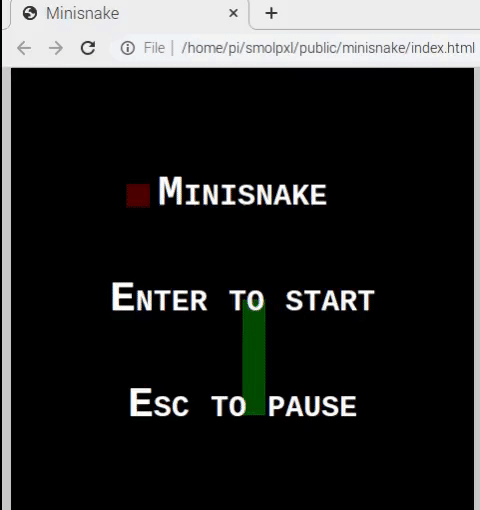
Welcome! We are going to code a whole snake game. It’s going to look like this:

A finished snake game being played

It doesn’t matter if you have never written any code before: I am going to try and explain everything from scratch.

I’m going to assume you are using a Raspberry Pi. but you don’t need one – all you need is Git, a text editor (like Notepad on Windows) and a web browser (like Firefox or Chrome or Safari or Edge). All laptops and desktop PCs should have the last two. On a tablet or phone it will be more tricky: try to use a Raspberry Pi or other computer if you can. If you are not using a Raspberry Pi, the screenshots will look a bit different, so you’ll have to do a little detective work to follow along.

For the first part where we download some code, your Raspberry Pi needs to be connected to the Internet, but once the “git clone” part is done, you can do everything else disconnected.

Before we start

If you’ve got a Raspberry Pi with Raspberry Pi OS on it, you are ready to go!

If you’re on another computer, make sure you’ve got Git installed. This should be easy on Linux, and possible on Mac or Windows.

Setting up

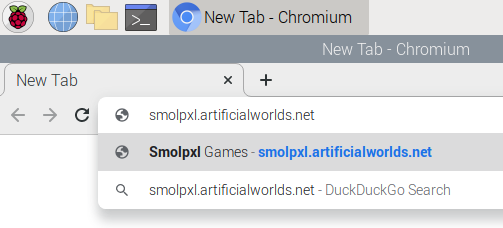
The first thing we need to do is download the code we are going to use to help us make a game. We’ll get it from my games web site, Smolpxl games.

Start your web browser:

Click the browser launch button

type in the address: smolpxl.artificialworlds.net

Typing the address into the browser address bar

and press Enter.

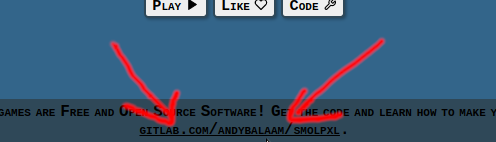
Scroll to the bottom of the page and click the link “make your own games at gitlab.com/andybalaam/smolpxl“.

Choosing the gitlab link at the bottom of the page

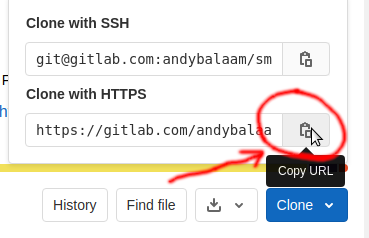
On the GitLab page that loads, click on Clone on the right:

Clicking the Clone button

and, under “Clone with HTTPS” click the “Copy URL” button:

Clicking the Copy URL button under Clone with HTTPS

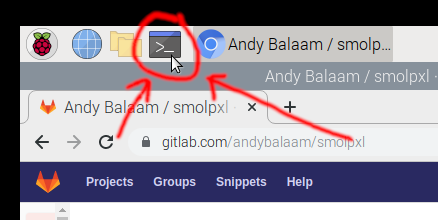
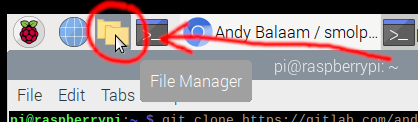
Now start the Terminal:

Starting the Terminal by clicking its icon

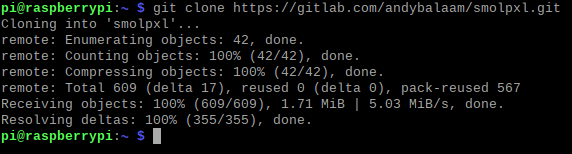
and type in “git clone” followed by a space, but don’t press Enter yet. Right-click in the Terminal and choose “Paste” to paste in the URL that we copied before.

Your Terminal should look like this:

The Terminal showing text: git clone https://gitlab.com/andybalaam/smolpxl.git

Press Enter, and it should change to look like this:

Results of a successful git clone command

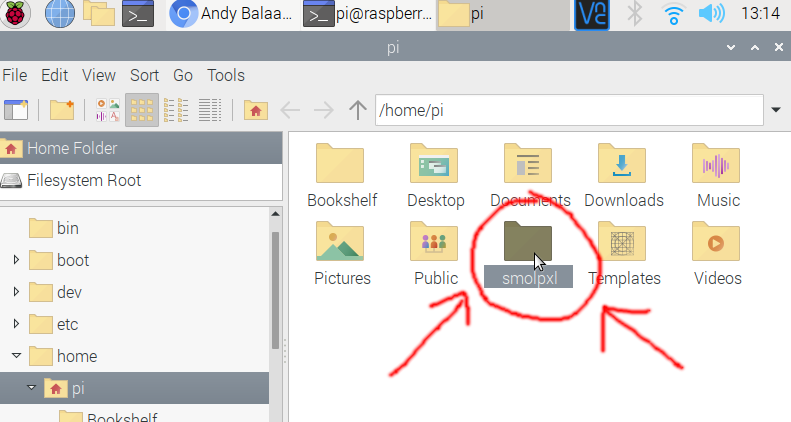
Go to your file manager:

Opening file manager by clicking its icon

and double-click on “smolpxl”:

Double-clicking smolpxl folder

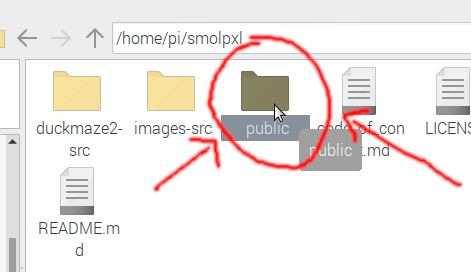
and then double-click on “public”:

Double-clicking public folder

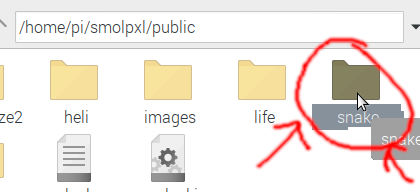
We are going to copy the “snake” folder. Right-click on it:

Right-clicking the snake folder

and choose “Copy”:

Choosing "Copy"

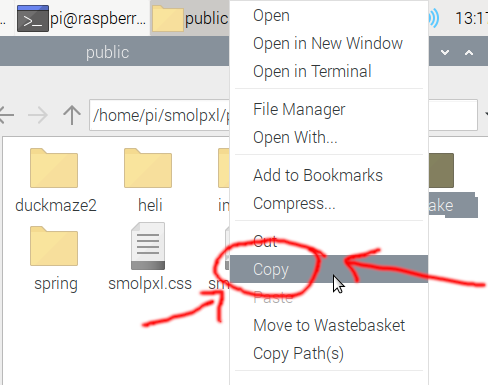
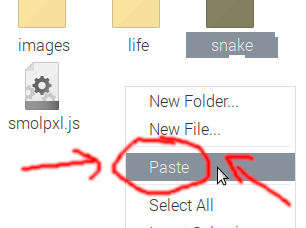
then right-click somewhere in the space below, and click “Paste”:

Choosing Paste

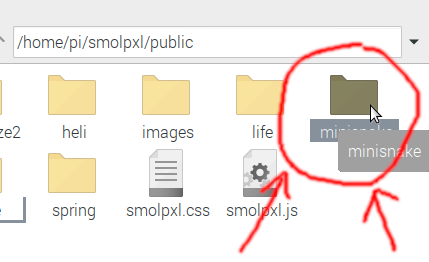
The Pi doesn’t want to paste the new one over the old one, so type a new name for it: “minisnake”, and click “Rename”:

Renaming pasted folder to minisnake

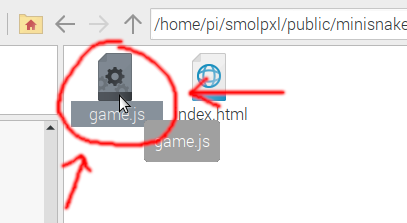
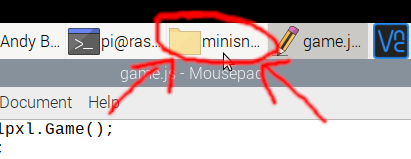
Now go into your new minisnake folder by double-clicking on it:

Double-clicking the new minisnake folder

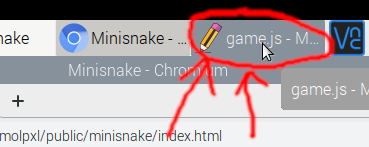
We’re going to edit the file called game.js. To do this, double-click on it:

Double-clicking game.js

This should open the code in a text editor program called Mousepad. (If you’re not on a Raspberry Pi, you might need to right-click the file and choose “Edit”, or similar, to open it in a text editor.)

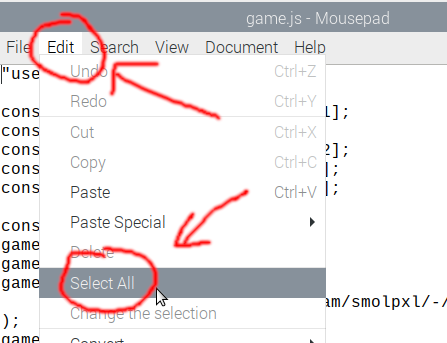
We want to delete everything in here and start again. Click “Edit”, then “Select all”:

Choosing Edit, then Select All, and hello to you if you are reading this!

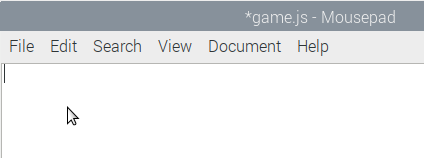
Now press the “Delete” key, and all the code should be gone:

Mousepad with all the code gone

We are ready to start!

A game that does nothing

First, we’re going to type some code that gets us ready, but doesn’t actually do anything useful.
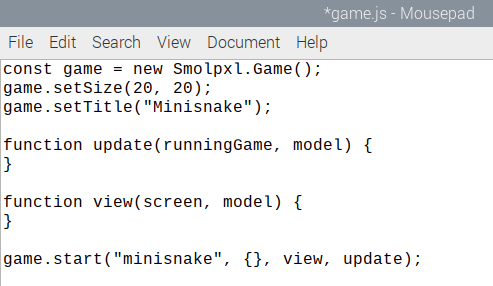
Type in this code:

const game = new Smolpxl.Game();
game.setSize(20, 20);
game.setTitle("Minisnake");

function update(runningGame, model) {
}

function view(screen, model) {
}

game.start("minisnake", {}, view, update);

This sets the size of our screen (20 by 20 squares), and a title, and gets things ready for our game. Notice that we start our game by writing game.start.

Once you’ve typed in the code:

Mousepad with the code I just told you to type in

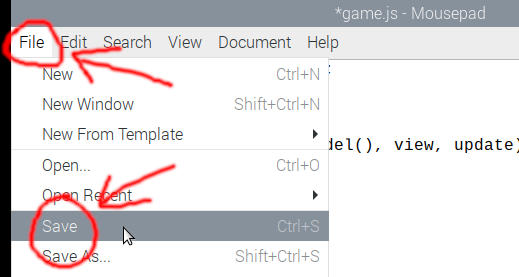
click “File” and then “Save”:

Choosing "File", then "Save"

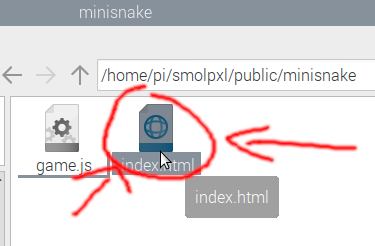
Now we’re going to try it out! Go back to the minisnake folder:

Switching back to file manager, which is on the minisnake folder still

and double-click on the file called index.html:

Double-clicking index.html

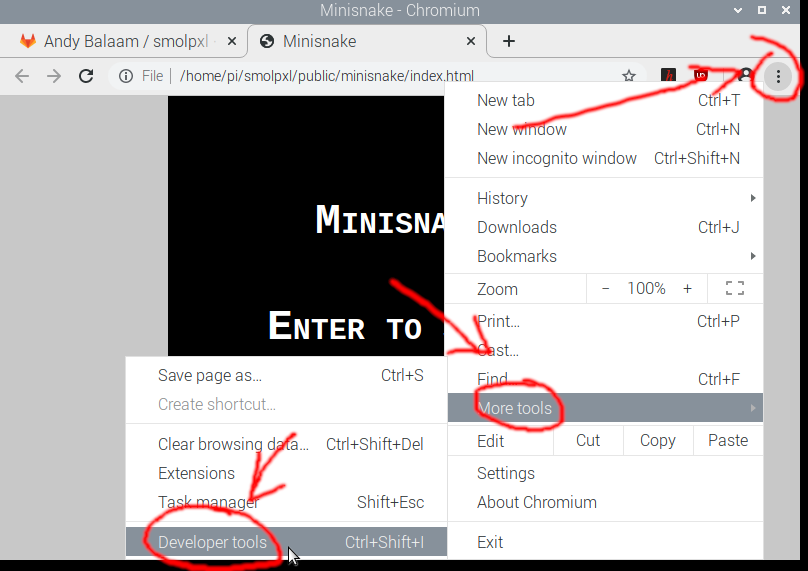
If you typed everything correctly, a title screen should appear. To figure out any problems, we will want the Developer tools open. To do that, click the three dots in the top right, then “More tools”, and “Developer tools”:

Choosing Chromium's burger menu in the top right, then clicking More tools, then Developer Tools

The tool we want is the Console, so click “Console” to see it:

Choosing the Console tab in Developer tools

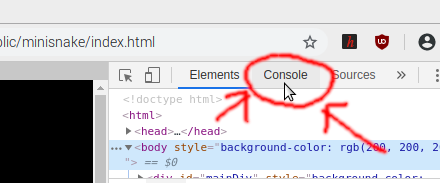
If everything went well, the Console should be empty:

Our game on the left, and the Console on the right, with no error messages showing

If you see red error messages in the Console, you probably have a typo: double-check everything you typed, and compare it with this version: game-01-nothing.js.

Now we have everything ready to get started, and you can see our game already has a title screen!

The game is going to be made from three things:

  • a model,
  • a view, and
  • an update function.

Let’s start with the model and the view.

The Model and the View

The first thing we’re going to do is add an apple to the game. To do that, we need to do two things:

  • say where the apple is, and
  • draw the apple on the screen.

To say where the apple is, we need a model. We actually already have a model, but it’s just empty.

Switch back to your code:

Switching back to Mousepad by clicking game.js in the top bar

Look at the last line of code we typed, and find where you typed {}. This is the “model”, or the state of out game when we start it off. Now, we’re going to replace that with newModel(), which means call a function called newModel. (A function is a piece of code that we can re-use, and “calling” a function means running that code.)

So we’re going to write a function called newModel, and then call it. Replace the very last line of your code with this:

function newModel() {
    return {
        apple: [5, 5]
    };
}

game.start("minisnake", newModel(), view, update);

The top part makes a function called newModel, and the bottom part is the same as you had before, except {} is replaced by newModel().

Have another look at the newModel function we wrote (the top part). Can you see where we made the apple? After the word return, we have some stuff inside curly brackets ({ and later, }). When we use curly brackets like that, we are making what JavaScript calls an object. Objects have properties. So far, our object only has one property, which is called “apple”. The right-hand part, [5, 5] is how we are say where our apple is – it’s at the position 5 squares in from the left, and 5 squares down from the top of our screen.

Now we have said where our apple is, we also need to draw it on the screen. That happens inside the view function. Scroll up and find the part that says function view() and add a new line between the opening { and the closing one:

function view(screen, model) {
    screen.set(model.apple[0], model.apple[1], [255, 0, 0]);
}

We are calling a function called screen.set, which draws a square on the screen. We are passing in three things to it: two points for the position to draw, and then the colour to use. The position is model.apple[0], which means take the first part of the [5, 5] we typed before, and model.apple[1], which means take the second part. The color is [255, 0, 0] which means lots of red, and no green or blue, because this is a red-green-blue (RGB) colour.

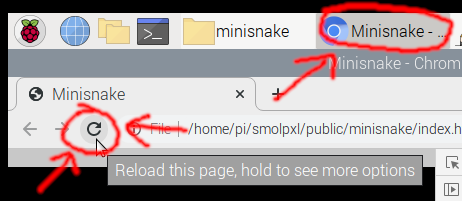
So let’s try this out and see whether the apple is drawn on the screen. First save your code in Mousepad, then switch back to our game (in Chromium), and click the refresh button to reload it.

Switching back to Chromium in the top bar, then clicking the refresh button

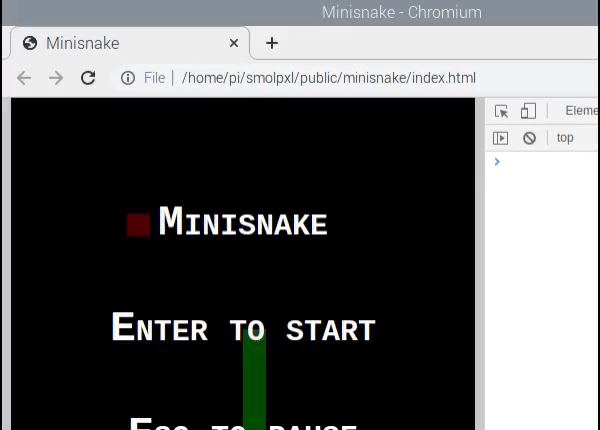
You should see your game saying “Enter to start”. Click on it, and the game should start, and look like this:

The game window is black, except there is a red square for the apple

Well done, you have drawn an apple!

If you see red error messages in the Console, you probably have a typo: double-check everything you typed, and compare it with this version: game-02-just-apple.js.

Drawing a snake

Now that we have an apple, let’s follow the exact same pattern to add a snake. We’re going to add information about it to the model, and then use that information to draw it on the screen.

First, change the newModel function to look like this:

function newModel() {
    return {
        apple: [5, 5],
        body: [[10, 10], [10, 11], [10, 12], [10, 13], [10, 14]]
    };
}

Don’t miss the extra comma at end of the “apple” line!

To give the co-ordinates of the apple, we just used one [x, y] pair. Because the snake’s body is made from 5 points, we need 5 similar pairs.

We’ve described the snake’s body position, so now let’s draw it on the screen. Update the view function so it looks like this:

function view(screen, model) {
    // Snake
    for (const [x, y] of model.body) {
        screen.set(x, y, [0, 255, 0]);
    }

    // Apple
    screen.set(model.apple[0], model.apple[1], [255, 0, 0]);
}

We have added a for loop – it runs through all the points in body, and for each one it draws a square on the screen. This time the colour is [0, 255, 0], which means the snake will be green.

(By the way, did you notice the lines we added that start with // – these are “comments” – we can write anything we like after the slashes and it doesn’t do anything. We can use comments to add notes that help us remember what different bits of our program do.

Save the file, go back to the game in Chromium and click the Refresh button again. If all goes well, you should see the snake appear:

A black game screen, with a red dot and green line for the snake

If you see red error messages in the Console, you probably have a typo: double-check everything you typed, and compare it with this version: game-03-snake.js.

So now we have a snake and an apple, but nothing is really happening … let’s fix that next.

Making the snake move

We’ve made a model in newModel and we’ve drawn it on the screen in view, but how do we make things move around? That is where the update function comes in: this is where we change the model based on what is happening.

Let’s start by making the snake move forward forever. Change the update function to look like this:

function update(runningGame, model) {
    // Move the snake
    let newHead = Smolpxl.coordMoved(model.body[0], model.dir);
    let newTail = model.body.slice(0, -1);

    model.body = [newHead, ...newTail];
    return model;
}

and change the newModel function to look like this:

function newModel() {
    return {
        apple: [5, 5],
        body: [[10, 10], [10, 11], [10, 12], [10, 13], [10, 14]],
        dir: Smolpxl.directions.UP
    };
}

Again, notice the comma at the end of the body line!

We added dir to the model, which is the direction the snake is facing.

The update function makes newHead by moving the snake’s head (the first entry in its body, which it gets with model.body[0]) in the direction it is facing (model.dir). Then we create newTail, which is everything in the old model.body except the last entry in the list (this is what .slice(0, -1) means).

Finally we update the body by setting it to [newHead, ...newTail], which just means make a new list by sticking newHead on to the beginning of newTail.

Save, switch to the game in Chromium, and refresh. Because we set dir to Smolpxl.directions.UP inside newModel, the snake moves updards!

The green snake moves up the screen (and off the top)

If you see red error messages in the Console, you probably have a typo: double-check everything you typed, and compare it with this version: game-04-movement.js.

If the snake disappears off the top, click the refresh button to see it again.

The game isn’t too much fun yet. Let’s add some keyboard controls, and allow you to die when you go off-screen.

Controlling the snake

The update function moves the snake, but now it’s time to make it a bit cleverer, by changing direction when you press a key, and stopping you when you go off-screen. Change it so it looks like this:

function update(runningGame, model) {
    if (!model.alive) {
        return;
    }

    if (runningGame.receivedInput("LEFT"))  {
        model.dir = Smolpxl.directions.LEFT;
    } else if (runningGame.receivedInput("RIGHT")) {
        model.dir = Smolpxl.directions.RIGHT;
    } else if (runningGame.receivedInput("UP")) {
        model.dir = Smolpxl.directions.UP;
    } else if (runningGame.receivedInput("DOWN")) {
        model.dir = Smolpxl.directions.DOWN;
    }

    // Move the snake
    let newHead = Smolpxl.coordMoved(model.body[0], model.dir);
    let newTail = model.body.slice(0, -1);

    // Die if we hit the edge
    if (
        newHead[0] === runningGame.screen.minX ||
        newHead[0] === runningGame.screen.maxX ||
        newHead[1] === runningGame.screen.minY ||
        newHead[1] === runningGame.screen.maxY
    ) {
        model.alive = false;
    }

    model.body = [newHead, ...newTail];
    return model;
}

and change the newModel function to look like this:

function newModel() {
    return {
        alive: true,
        apple: [5, 5],
        body: [[10, 10], [10, 11], [10, 12], [10, 13], [10, 14]],
        dir: Smolpxl.directions.UP
    };
}

We keep track of whether the snake is alive in the model, and we immediately return from update if we are dead, meaning the snake stops moving. (The ! in if (!model.alive) means “not”, so we are saying what to do when we are not alive – when we are dead. The return here means immediately stop running the code in this function.)

The next new part of update allows us to check whether an arrow key was pressed (using the runningGame.receivedInput function), and if so, change the direction of the snake (model.dir).

Finally, nearer the end of update, we check whether the position of the snake’s head (newHead) is at one of the screen edges, by comparing its co-ordinates with the maximum and minimum co-ordinates on the screen. If we are off the edge, we set model.alive to false, meaning the snake is now dead.

Save, switch to the game in Chromium, and refresh. With all that, we can control the snake with the arrow keys, and it can die:

A snake moves around, turning because arrow keys were used to control it

Try clicking on your game and then pressing the arrow keys to control the snake.

If you see red error messages in the Console, you probably have a typo: double-check everything you typed, and compare it with this version: game-05-control.js.

This is kind-of a game, but surely it’s time to eat some apples?

Eating apples

If we’re going to be eating apples, they should probably not always be in the same place, right?

Let’s start off by making a brand new function. Make some space immediately above the update function, and type in this code:

function randApple() {
    return [Smolpxl.randomInt(1, 18), Smolpxl.randomInt(1, 18)];
}

This function gives us some random co-ordinates where we can place an apple. Update newModel to place the first apple at a random place, by making it look like this:

function newModel() {
    return {
        alive: true,
        apple: randApple(),
        body: [[10, 10], [10, 11], [10, 12], [10, 13], [10, 14]],
        dir: Smolpxl.directions.UP
    };
}

So instead of writing the exact co-ordinates we want ([5, 5]), now we’re calling our new randApple function, which gives us back some random co-ordinates.

Now we can place apples randomly, let’s change the update function to allow us to eat apples. While we’re there, let’s check whether we crashed into our own body too:

function update(runningGame, model) {
    ... All the same stuff as before ...

    // Die if we hit the edge
    if (
        newHead[0] === runningGame.screen.minX ||
        newHead[0] === runningGame.screen.maxX ||
        newHead[1] === runningGame.screen.minY ||
        newHead[1] === runningGame.screen.maxY
    ) {
        model.alive = false;
    }

    // If we hit the apple we get longer
    if (Smolpxl.equalArrays(newHead, model.apple)) {
        for (let i = 0; i < 5; i++) {
            newTail.push([-1, -1]);
        }
        model.apple = randApple();
    }

    // If we hit our own body, we die
    if (Smolpxl.arrayIncludesArray(newTail, newHead)) {
        model.alive = false;
    }

    model.body = [newHead, ...newTail];
    return model;
}

We use the Smolpxl.equalArrays function* to ask whether the new position of the snake’s head (newHead) is the same as the position of the apple (model.apple).

* The function is called “equalArrays” because both newHead and model.apple are lists of two co-ordinates (x and y), so we are storing them inside JavaScript “arrays”. You can spot an array because it is surrounded by square brackets ([).

If the head is on top of the apple, we do two things: add new items to the end of newTail, by using a for loop that runs 5 times. Each time it runs, it uses push to add another body part on the to the tail. (It actually adds an off-screen point [-1, -1] every time – this means they won’t get drawn at first, but as the snake moves forward, they will gradually get replaced by on-screen points, and we’ll see the snake gradually get longer.)

The second thing we do if the head is on the apple is move the apple by setting model.apple to another random point given to us by randApple.

We also check whether we have hit our own body using the Smolpxl.arrayIncludesArray function (asking whether newHead is the same point as one of the points in newTail) and set model.alive to false, meaning we’re dead, if so.

Save, switch to the game in Chromium, and refresh. Now we can really play a game of snake!

A snake moves around the screen, eating apples and getting longer when it does

If you see red error messages in the Console, you probably have a typo: double-check everything you typed, and compare it with this version: game-06-eating-apples.js.

We are nearly done. The last jobs are to make the game look a little nicer, and handle starting a new game after we crash.

Finishing off

We need to draw the walls around the edge that you crash into, and it would also be nice to show your score at the top of the screen. We can do both of these by adding a bit more at the beginning of the view function:

function view(screen, model) {
    screen.messageTopLeft(`Score: ${model.body.length}`);

    // Walls
    for (const x of screen.xs()) {
        screen.set(x, screen.minY, [150, 150, 150]);
        screen.set(x, screen.maxY, [150, 150, 150]);
    }
    for (const y of screen.ys()) {
        screen.set(screen.minX, y, [150, 150, 150]);
        screen.set(screen.maxX, y, [150, 150, 150]);
    }

    ... All the same stuff as before ...
}

We use the screen.messageTopLeft function to display a message at the top. To format the message we write some text inside backticks (`), which allows us to substitute values in. Here we typed ${model.body.length}, which means our score is how many points there are inside our body (which is the length of the array model.body). The ${} part just means “substitute this value in here”.

We make use of the screen.xs() and screen.ys() functions that give us a list of all the x and y co-ordinates on the screen to draw the wall.

Save, switch back to the game, and refresh to see how this looks. If you want to check what you have typed so far, compare it against game-07-walls-and-score.js.

The very last thing we need to do is handle restarting the game after we crash.

First, let’s display a message on the screen by updating the view function one last time:

function view(screen, model) {
    ... All the same stuff as before ...

    // Snake
    for (const [x, y] of model.body) {
        screen.set(x, y, [0, 255, 0]);
    }

    // Death
    if (!model.alive) {
        screen.set(model.body[0][0], model.body[0][1], [0, 0, 255]);
        screen.dim();
        const score = model.body.length;
        screen.message(["Well done!", `Score: ${score}`, "Press <SELECT>"]);
    }

    // Apple
    screen.set(model.apple[0], model.apple[1], [255, 0, 0]);
}

When the snake is not alive we draw a blue dot ([0, 0, 255]) where its head is, then make the screen dark with the screen.dim function, and write a message on the screen with the screen.message function.

Last, if we press Enter while the death message is visible, we want to go back to the start. We can do that with a small change to the update function:

function update(runningGame, model) {
    if (!model.alive) {
        if (runningGame.receivedInput("SELECT")) {
            runningGame.endGame();
            return newModel();
        } else {
            return;
        }
    }

    if (runningGame.receivedInput("LEFT"))  {
    ... All the same stuff as before ...

Notice that we deleted the line that just said return; and replaced it with the new if code. We check whether the user pressed the SELECT button (which means the Enter key) and if so, we tell Smolpxl to go back to the title screen by calling runningGame.endGame, and then we reset everything in the model by returning newModel().

Save, switch to the game in Chromium, and refresh. Our game is finished!

A finished snake game being played

If you see red error messages in the Console, you probably have a typo: double-check everything you typed, and compare it with this version: game-08-finished.js.

Well done!

If you got that working, you should be extremely pleased with yourself. Typing all that code correctly is a major challenge, and your determination has paid off.

Take a breath, and have a think about whether you can show what you’ve done to someone else. I’m pretty sure they will be impressed that you coded an entire game!

Challenges

When you’ve properly taken the time to enjoy the great work you’ve done, try reading through the code, and reading back through this blog post to try and understand how the program works.

To learn more about JavaScript and making web sites, you can follow this much more comprehensive tutorial: Getting started with the Web.

You’ve done really well. If you want an extra challenge, try improving your game using these challenges. Bear in mind though, working these out on your own will be much harder than what we’ve done so far:

  • Challenge 1: Display a different message if you don’t eat any apples. If you crash before eating any apples, you might need some extra encouragement: change the part of the view function where we display a “Well done!” message, and if our score is 5 (if (model.body.length === 5) then display a different message – maybe “Bad luck!”. Look for ifelse statements we have already written, to see how they work.
  • Challenge 2: Prevent going back on yourself. Update your code so that when snake is going right, and the user presses left, we ignore it. You will need to change the update function, where we use receivedInput to check what key the user pressed. Instead of just setting the direction, you will need to add a new if statement that check what direction we are facing already.
  • Challenge 3: Remember the high score. Remember the best score anyone has got, and display it at the top-right of the screen. At the moment in our code, we return newModel(); in update, when we want to restart the game. That means we have a totally fresh model, forgetting everything else that happened before. If we want to remember a high score, we can’t do that! If you want some extra inspiration, have a look at the more complete version of snake that comes with the Smolpxl games. It’s actually included in the code you downloaded with the git clone command you typed at the very beginning.

What next?

To learn more, try:

Remember to have fun, and be kind to the people you meet on the way.

Play and create little retro games at Smolpxl

Andy Balaam from Andy Balaam&#039;s Blog

I love simple games: playing them and writing them.

But, it can be overwhelming getting started in the complex ecosystems of modern technology.

So, I am writing the Smolpxl library, which is some JavaScript code that makes it quite simple to write simple, pixellated games. It gives you a fixed-size screen to draw on, and it handles your game loop and frames-per-second, so you can focus on two things: updating your game “model” – the world containing all the things that exist in your game, and drawing onto the screen.

I am also writing some games with this library, and publishing them at smolpxl.artificialworlds.net:

I am hoping this site will gradually gain more and more Free and Open Source games, and start to rival some of the advertising-supported sites for the attention of casual gamers, especially kids.

Smolpxl is done for fun, and for its educational value, so it should be a safer place for kids than a world of advertising, loot boxes and site-wide currencies.

As I write games, I want to show how easy and fun it can be, so I will be streaming myself live doing it on twitch.tv/andybalaam, and putting the recordings up on peertube.mastodon.host/accounts/andybalaam and youtube.com/user/ajbalaam.

I am hoping these videos will serve as tutorials that help other people get into writing simple games.

Would you like to help? If so:

shareon.js.org now has a Share to Mastodon button

Andy Balaam from Andy Balaam&#039;s Blog

I was looking for the right way to make a “Share This”-style button for my tiny games site Smolpxl, and I found shareon which worked exactly the way I wanted (load the JavaScript and call a function to display the buttons, with no privacy concerns), and looked really nice.

The only thing that was missing was a Mastodon button.

“Share to Mastodon” is more complicated than something like Share to Twitter, because Mastodon is not one web site, but lots of web sites that all talk to each other.

So, after someone clicks “Share to Mastodon”, you need to ask them which web site (or Mastodon instance) they meant.

I started out by hacking a Mastodon button in after the shareon ones, and prompting the user for their instance. This was a little unfriendly, but it worked:

Click Share, Mastodon, enter instance URL into ugly browser prompt, and end up at Mastodon

But luckily I didn’t stick with that. Because I think shareon is awesome, and because I want more people to use Mastodon, I decided to try adding a Mastodon button to shareon. I wrote the code to work similarly to my original hack, and submitted a Pull Request.

I am really glad I did that, because what followed was a really positive Free and Open Source Software mini-interaction. Nick Karamov responded with lots of improvements and bug fixes to my original change, and as we discussed the problem more, I expressed the desire for a proper page to choose Mastodon instance, that would be more friendly than a simple prompt. I also said that it would be difficult.

In retrospect, maybe suggesting it would be difficult was a clever trick, because the next thing I knew, Nick had implemented just such a page: toot.karamoff.dev!

Because toot.karamoff.dev now existed, the “Share to Mastodon” button became much simpler: we can send our post information to toot.karamoff.dev, and it asks which Mastodon instance you want to use, and passes it on the correct place.

So my new Pull Request was much simpler than the original, and with a few more improvements suggested by Nick, it’s merged and I have a usable Share to Mastodon button without hacking it in.

The cake has a little more icing too, because I was also able to improve toot.karamoff.dev by adding code that downloads the up-to-date list of Mastodon instances from joinmastodon.org and provides them as suggestions, which can be really helpful if you can’t remember the exact name of your instance. Again, Nick’s suggestions on my Pull Request were incredibly helpful and made the code way better than what I originally wrote. Now it works really smoothly:

Click Share, Mastodon, choose instance from a friendly list on toot, and end up at Mastodon

In a small way, this was a fantastic example of how effective and fun working on Free and Open Source Software can be.

short – command line tool to truncate lines to fit in the terminal

Andy Balaam from Andy Balaam&#039;s Blog

Sometimes I run grep commands that search files with hugely-long lines. If those lines match, they are printed out and spam my terminal with huge amounts of information, that I probably don’t need.

I couldn’t find a tool that limits the line-length of its output, so I wrote a tiny one.

It’s called short.

You use it like this (my typical usage):

grep foo myfile.txt | short

Or specify the column width like this:

short -w 5 myfile.txt

It’s written in Rust. Feel free to add features, fix bugs and package it for your operating system/distribution!

How to send an SMS using netcat (via SMPP)

Andy Balaam from Andy Balaam&#039;s Blog

SMPP is a binary protocol used by phone companies to send text messages, otherwise known as SMS messages.

It can work over TCP, so we can use netcat on the command line to send messages.

Setting up

[Note: the netcat I am using is Ncat 7.70 on Linux.]

The server that receives messages is called an SMSC. You may have your own one, but if not, you can use the CloudHopper one like this:

sudo apt install make maven  # (or similar on non-Debian-derived distros)
git clone https://github.com/fizzed/cloudhopper-smpp.git
cd cloudhopper-smpp

If you are a little slow, like me, I’d suggest making it wait a bit longer for bind requests before giving up on you. To do that, edit the main() method of src/test/java/com/cloudhopper/smpp/demo/ServerMain.java to add a line like this: configuration.setBindTimeout(500000); on about line 80, near the other similar lines. This will make it wait 500 seconds for you to send a BIND_TRANSCEIVER, instead of giving up after just 5 seconds.

Once you’ve made that change, you can run:

make server

Now you have an SMSC running!

Leave that open, and go into another terminal, and type:

mkfifo tmpfifo
nc 0.0.0.0 2776 < tmpfifo | xxd

The mkfifp part creates a “fifo” – a named pipe through which we will send our SMPP commands.

The nc part starts Ncat, connecting to the SMSC we started.

The xxd part will take any binary data coming out of Ncat and display it in a more human-readable way.

Leave that open too, and in a third terminal type:

exec 3> tmpfifo

This makes everything we send to file descriptor 3 go into the fifo, and therefore into Ncat.

Now we have a way of sending binary data to Ncat, which will send it on to the SMSC and print out any responses.

Note: we will be using SMPP version 3.4 since it is in the widest use, even though it is not the newest.

Terminology

“SMPP” is the protocol we are speaking, which we are using over TCP/IP.

An SMSC is a server (which receives messages intended for phones and sends back responses and receipts).

We will be acting as an ESME or client (which sends messages intended for phones and receives responses and receipts).

The units of information that are passed back and forth in SMPP are called “PDUs” (Protocol Data Units) – these are just bits of binary data that flow over the TCP connection between two computers.

The spec talks about “octets” – this means 8-bit bytes.

ENQUIRE_LINK

First, we’ll check the SMSC is responding, by sending an ENQUIRE_LINK, which is used to ask the SMSC whether it’s there and working.

Go back to the third terminal (where we ran exec) and type this:

LEN16='\x00\x00\x00\x10'
ENQUIRE_LINK='\x00\x00\x00\x15'
NULL='\x00\x00\x00\x00'
SEQ1='\x00\x00\x00\x01'

echo -n -e "${LEN16}${ENQUIRE_LINK}${NULL}${SEQ1}" >&3

Explanation: an ENQUIRE_LINK PDU consists of:

  • 4 bytes to say the length of the whole PDU in bytes. ENQUIRE_LINK PDUs are always 16 bytes, “00000010” in hex. I called this LEN.
  • 4 bytes to say what type of PDU this is. ENQUIRE_LINK is “00000015” in hex. I called this ENQUIRE_LINK.
  • 4 bytes that are always zero in ENQUIRE_LINK. I called this NULL.
  • 4 bytes that identify this request, called a sequence number. The response from the server will include this so we can match responses to requests. I called this SEQ.

Check back in the second terminal (where you ran nc). If everything worked, you should see something like this:

00000000: 0000 0010 8000 0015 0000 0000 0000 0001  ................

Ignoring the first and last parts (which are how xxd formats its output), the response we receive is four 4-byte parts, very similar to what we sent:

  • 4 bytes to say the length of the whole PDU in bytes. Here it is “00000010” hex, or 16 decimal.
  • 4 bytes to say what type of PDU this is. Here is is ENQUIRE_LINK is “80000015” in hex, which is the code for ENQUIRE_LINK_RESP.
  • 4 bytes for the success status of the ENQUIRE_LINK_RESP. This is always “00000000”, which means success and is called ESME_ROK in the spec.
  • 4 bytes that match the sequence number we sent. This is “00000001”, as we expected.

BIND_TRANSCEIVER

Now we can see that the SMSC is working, let’s “bind” to it. That means something like logging in: we convince the SMSC that we are a legitimate client, and tell it what type of connection we want, and, assuming it agrees, it will hold the connection open for us for as long as we need.

We are going to bind as a transceiver, which means both a transmitter and receiver, so we can both send messages and receive responses.

Send the bind request like this:

LEN32='\x00\x00\x00\x20'
BIND_TRANSCEIVER='\x00\x00\x00\x09'
NULL='\x00\x00\x00\x00'
SEQ2='\x00\x00\x00\x02'
SYSTEM_ID="sys\x00"
PASSWORD="pas\x00"
SYSTEM_TYPE='typ\x00'
SYSTEM_ID='sys\x00'
PASSWORD='pas\x00'
INTERFACE_VERSION='\x01'
INTERFACE_VERSION='\x34'
ADDR_TON='\x00'
ADDR_NPI='\x00'
ADDRESS_RANGE='\x00'

echo -n -e "${LEN32}${BIND_TRANSCEIVER}${NULL}${SEQ2}${SYSTEM_ID}${PASSWORD}${SYSTEM_TYPE}${INTERFACE_VERSION}${ADDR_TON}${ADDR_NPI}${ADDRESS_RANGE}" >&3

Explanation: this PDU is 32 bytes long, so the first thing we send is “00000020” hex, which is 32.

Then we send “00000009” for the type: BIND_TRANSCEIVER, 4 bytes of zeros, and a sequence number – this time I used 2.

That was the header. Now the body of the PDU starts with a system id (basically a username), a password, and a system type (extra info about who you are). These are all variable-length null-terminated strings, so I ended each one with \x00.

The rest of the body is some options about the types of phone number we will be sending from and sending to – I made them all “00” hex, which means “we don’t know”.

If it worked, you should see this in the nc output:

00000000: 0000 0021 8000 0009 0000 0000 0000 0002  ...!............
00000010: 636c 6f75 6468 6f70 7065 7200 0210 0001  cloudhopper.....

As before, the first 4 bytes are for how long the PDU is – 33 bytes – and the next 4 bytes are for what type of PDU this is – “80000009” is for BIND_TRANSCEIVER_RESP which is the response to a BIND_TRANSCEIVER.

The next 4 bytes are for the status – these are zeroes which indicates success (ESME_ROK) again. After that is our sequence number (2).

The next 15 bytes are the characters of the word “cloudhopper” followed by a zero – this is the system id of the SMSC.

The next byte (“01”) – the last one we can see – is the beginning of a “TLV”, or optional part of the response. xxd actually delayed the last byte of the output, so we can’t see it yet, but it is “34”. Together, “0134” means “the interface version we support is SMPP 3.4”.

SUBMIT_SM

The reason why we’re here is to send a message. To do that, we use a SUBMIT_SM:

LEN61='\x00\x00\x00\x3d'
SUBMIT_SM='\x00\x00\x00\x04'
SEQ3='\x00\x00\x00\x03'
SERVICE_TYPE='\x00'
SOURCE_ADDR_TON='\x00'
SOURCE_ADDR_NPI='\x00'
SOURCE_ADDR='447000123123\x00'
DEST_ADDR_TON='\x00'
DEST_ADDR_NPI='\x00'
DESTINATION_ADDR='447111222222\x00'
ESM_CLASS='\x00'
PROTOCOL_ID='\x01'
PRIORITY_FLAG='\x01'
SCHEDULE_DELIVERY_TIME='\x00'
VALIDITY_PERIOD='\x00'
REGISTERED_DELIVERY='\x01'
REPLACE_IF_PRESENT_FLAG='\x00'
DATA_CODING='\x03'
SM_DEFAULT_MSG_ID='\x00'
SM_LENGTH='\x04'
SHORT_MESSAGE='hihi'
echo -n -e "${LEN61}${SUBMIT_SM}${NULL}${SEQ3}${SERVICE_TYPE}${SOURCE_ADDR_TON}${SOURCE_ADDR_NPI}${SOURCE_ADDR}${DEST_ADDR_TON}${DEST_ADDR_NPI}${DESTINATION_ADDR}${ESM_CLASS}${PROTOCOL_ID}${PRIORITY_FLAG}${SCHEDULE_DELIVERY_TIME}${VALIDITY_PERIOD}${REGISTERED_DELIVERY}${REPLACE_IF_PRESENT_FLAG}${DATA_CODING}${SM_DEFAULT_MSG_ID}${SM_LENGTH}${SHORT_MESSAGE}" >&3

LEN61 is the length in bytes of the PDU, SUBMIT_SM is the type of PDU, and SEQ3 is a sequence number, as before.

SOURCE_ADDR is a null-terminated (i.e. it ends with a zero byte) string of ASCII characters saying who the message is from. This can be a phone number, or a name (but the rules about what names are allowed are complicated and region-specific). SOURCE_ADDR_TON and SOURCE_ADDR_NPI give information about what type of address we are providing – we set them to zero to mean “we don’t know”.

DESTINATION_ADDR, DEST_ADDR_TON and DEST_ADDR_NPI describe the phone number we are sending to.

ESM_CLASS tells the SMSC how to treat your message – we use “store and forward” mode, which means keep it and send it when you can.

PROTOCOL_ID tells it what to do if it finds duplicate messages – we use “Replace Short Message Type 1”, which I guess means use the latest version you received.

PRIORITY_FLAG means how important the message is – we used “interactive”.

SCHEDULE_DELIVERY_TIME is when to send – we say “immediate”.

VALIDITY_PERIOD means how long should this message live before we give up trying to send it (e.g. if the user’s phone is off). We use “default” so the SMSC will do something sensible.

REGISTERED_DELIVERY gives information about whether we want a receipt saying the message arrived on the phone. We say “yes please”.

REPLACE_IF_PRESENT_FLAG is also about duplicate messages (I’m not sure how it interacts with PROTOCOL_ID) – the value we used means “don’t replace”.

DATA_CODING states what character encoding you are using to send the message text – we used “Latin 1”, which means ISO-8859-1.

SM_DEFAULT_MSG_ID allows us to use one of a handful of hard-coded standard messages – we say “no, use a custom one”.

SM_LENGTH is the length in bytes of the “short message” – the actual text that the user will see on the phone screen.

SHORT_MESSAGE is the short message itself – our message is all ASCII characters, but we could use any bytes and they will be interpreted as characters in ISO-8859-1 encoding.

You should see a response in the other terminal like this:

00000020: 3400 0000 1180 0000 0400 0000 0000 0000  4...............

The initial “34” is the left-over byte from the previous message as mentioned above. After that, we have:

“00000011” for the length of this PDU (11 bytes).

“80000004” for the type – SUBMIT_SM_RESP which tells us whether the message was accepted (but not whether it was received).

“00000000” for the status – zero means “OK”.

The last two bytes are chopped off again, but what we actually get back is:

“00000003”, which is the sequence number, and then:

“00” which is a null-terminated ASCII message ID: in this case the SMSC is saying that the ID it has given this message is “”, which is probably not very helpful! If this ID were not empty, it would help us later if we receive a delivery receipt, or if we want to ask about the message, or change or cancel it.

DELIVER_SM

If you stop the SMSC process (the one we started with make server) by pressing Ctrl-C, and start a different one with make server-echo, and then repeat the other commands (note you need to be quick because you only get 5 seconds to bind before it gives up on you – make similar changes to what we did in ServerMain to ServerEchoMain if this causes problems), you will receive a delivery receipt from the server, which looks like this:

“0000003d” for the length of this PDU (59 bytes).

“00000005” for the type (DELIVER_SM).

“00000000” for the unused command status.

“00000001” as a sequence number. Note, this is unrelated the sequence number of the original message: to match with the original message, we must use the message ID provided in the SUBMIT_SM_RESP.

“0000003400” to mean we are using SMPP 3.4. (This is a null-terminated string of bytes.)

“00” and “00” for the TON and NPI of the source address, followed by the source address itself, which is a null-terminated ASCII string: “34343731313132323232323200”. This translates to “447111222222”, which was the destination address of our original message. Note: some SMSCs switch the source and destination addresses like this in their delivery receipts, and some don’t, which makes life interesting.

“00” and “00” for the TOM and NPI of the destination address, followed by “34343730303031323331323300” for the address itself, which translates to “447000123123”, as expected.

The DELIVER_SM PDU continues with much of the information repeated from the original message, and the SMSC is allowed to providing a short message as part of the receipt – in our example the cloudhopper SMSC repeats the original message. Some SMSCs use the short message to provide information such as the message ID and the delivery time, but there is no formal standard for how to provide it. Other SMSCs use a TLV to provide the message ID instead.

In order to complete the conversation, you should provide a DELIVER_SM_RESP, and then an UNBIND, but hopefully based on what we’ve done and the SMPP 3.4 standard, you should be able to figure it out.

You did it

SMPP is a binary protocol layered directly on top of TCP, which makes it slightly harder to work with by hand than the HTTP protocols with which many of us are more familiar, but I hope I’ve convinced you it’s possible to understand what’s going on without resorting to some kind of heavyweight debugging tool or library.

Happy texting!

Example Android project with repeatable tests running inside an emulator

Andy Balaam from Andy Balaam&#039;s Blog

I’ve spent the last couple of days fighting the Android command line to set up a simple project that can run automated tests inside an emulator reliably and repeatably.

To make the tests reliable and independent from anything else on my machine, I wanted to store the Android SDK and AVD files in a local directory.

To do this I had to define a lot of inter-related environment variables, and wrap the tools in scripts that ensure they run with the right flags and settings.

The end result of this work is here: gitlab.com/andybalaam/android-skeleton

You need all the utility scripts included in that repo for it to work, but some highlights include:

The environment variables that I source in every script, scripts/paths:

PROJECT_ROOT=$(dirname $(dirname $(realpath ${BASH_SOURCE[${#BASH_SOURCE[@]} - 1]})))
export ANDROID_SDK_ROOT="${PROJECT_ROOT}/android_sdk"
export ANDROID_SDK_HOME="${ANDROID_SDK_ROOT}"
export ANDROID_EMULATOR_HOME="${ANDROID_SDK_ROOT}/emulator-home"
export ANDROID_AVD_HOME="${ANDROID_EMULATOR_HOME}/avd"

Creation of a local.properties file that tells Gradle and Android Studio where the SDK is, by running something like this:

echo "# File created automatically - changes will be overwritten!" > local.properties
echo "sdk.dir=${ANDROID_SDK_ROOT}" >> local.properties

The wrapper scripts for Android tools e.g. scripts/sdkmanager:

#!/bin/bash

set -e
set -u

source scripts/paths

"${ANDROID_SDK_ROOT}/tools/bin/sdkmanager" \
    "--sdk_root=${ANDROID_SDK_ROOT}" \
    "$@"

The wrapper for avdmanager is particularly interesting since it seems we need to override where it thinks the tools directory is for it to work properly – scripts/avdmanager:

#!/bin/bash

set -e
set -u

source scripts/paths

# Set toolsdir to include "bin/" since avdmanager seems to go 2 dirs up
# from that to find the SDK root?
AVDMANAGER_OPTS="-Dcom.android.sdkmanager.toolsdir=${ANDROID_SDK_ROOT}/tools/bin/" \
    "${ANDROID_SDK_ROOT}/tools/bin/avdmanager" "$@"

An installation script that must be run once before using the project scripts/install-android-tools:

#!/bin/bash

set -e
set -u
set -x

source scripts/paths

mkdir -p "${ANDROID_SDK_ROOT}"
mkdir -p "${ANDROID_AVD_HOME}"
mkdir -p "${ANDROID_EMULATOR_HOME}"

# Download sdkmanager, avdmanager etc.
cd "${ANDROID_SDK_ROOT}"
test -f commandlinetools-*.zip || \
    wget -q 'https://dl.google.com/android/repository/commandlinetools-linux-6200805_latest.zip'
unzip -q -u commandlinetools-*.zip
cd ..

# Ask sdkmanager to update itself
./scripts/sdkmanager --update

# Install the emulator and tools
yes | ./scripts/sdkmanager --install 'emulator' 'platform-tools'

# Platforms
./scripts/sdkmanager --install 'platforms;android-21'
./scripts/sdkmanager --install 'platforms;android-29'

# Install system images for our oldest and newest supported API versions
yes | ./scripts/sdkmanager --install 'system-images;android-21;default;x86_64'
yes | ./scripts/sdkmanager --install 'system-images;android-29;default;x86_64'

# Create AVDs to run the system images
echo no | ./scripts/avdmanager -v \
    create avd \
    -f \
    -n "avd-21" \
    -k "system-images;android-21;default;x86_64" \
    -p ${ANDROID_SDK_ROOT}/avds/avd-21
echo no | ./scripts/avdmanager -v \
    create avd \
    -f \
    -n "avd-29" \
    -k "system-images;android-29;default;x86_64" \
    -p ${ANDROID_SDK_ROOT}/avds/avd-29

Please do contribute to the project if you know easier ways to do this stuff.

Creating a tiny Docker image of a Rust project

Andy Balaam from Andy Balaam&#039;s Blog

I am building a toy project in Rust to help me learn how to deploy things in AWS. I’m considering using Elastic Beanstalk (AWS’s platform-as-a-service) and also Kubernetes. Both of these support deploying via Docker containers, so I am learning how to package a Rust executable as a Docker image.

My program is a small web site that uses Redis as a back end database. It consists of some Rust code and a couple of static files.

Because Rust has good support for building executables with very few dependencies, we can actually build a Docker image with almost nothing in it, except my program and the static files.

Thanks to Alexander Brand’s blog post How to Package Rust Applications Into Minimal Docker Containers I was able to build a Docker image that:

  1. Is very small
  2. Does not take too long to build

The main concern for making the build faster is that we don’t download and build all the dependencies every time. To achieve that we make sure there is a layer in the Docker build process that includes all the dependencies being built, and is not re-built when we only change our source code.

Here is the Dockerfile I ended up with:

# 1: Build the exe
FROM rust:1.42 as builder
WORKDIR /usr/src
Creating a tiny Docker image of a Rust project
# 1a: Prepare for static linking
RUN apt-get update && \
    apt-get dist-upgrade -y && \
    apt-get install -y musl-tools && \
    rustup target add x86_64-unknown-linux-musl

# 1b: Download and compile Rust dependencies (and store as a separate Docker layer)
RUN USER=root cargo new myprogram
WORKDIR /usr/src/myprogram
COPY Cargo.toml Cargo.lock ./
RUN cargo install --target x86_64-unknown-linux-musl --path .

# 1c: Build the exe using the actual source code
COPY src ./src
RUN cargo install --target x86_64-unknown-linux-musl --path .

# 2: Copy the exe and extra files ("static") to an empty Docker image
FROM scratch
COPY --from=builder /usr/local/cargo/bin/myprogram .
COPY static .
USER 1000
CMD ["./myprogram"]

The FROM rust:1.42 as build line uses the newish Docker feature multi-stage builds – we create one Docker image (“builder”) just to build the code, and then copy the resulting executable into the final Docker image.

In order to allow us to build a stand-alone executable that does not depend on the standard libraries in the operating system, we use the “musl” target, which is designed to statically linked.

The final Docker image produced is pretty much the same size as the release build of myprogram, and the build is fast, so long as I don’t change the dependencies in Cargo.toml.

A couple more tips to make the build faster:

1. Use a .dockerignore file. Here is mine:

/target/
/.git/

2. Use Docker BuildKit, by running the build like this:

DOCKER_BUILDKIT=1 docker build  .

Keeping track of podcast times with a simple bash script on Linux

Andy Balaam from Andy Balaam&#039;s Blog

I was recording some podcast audio tonight and wanted to be able to press a single key when I reached a significant moment, so I could add the times to the show notes.

I couldn’t find anything that already did this, so I wrote a tiny bash script. I ran this script pressed Enter whenever I wanted a time recorded:

T=0
echo
while sleep 1; do
    echo -n -e "\e[1A"
    echo $(($T / 60))m $(($T % 60))s
    T=$(($T + 1))
done

Custom Bash tab completion for my program

Andy Balaam from Andy Balaam&#039;s Blog

I love Bash tab completion, and I want it for the command I am writing, so it can automatically complete parts of the command line when I run my program.

Code

Here is the script (install-bash-completion) I wrote to set it up (no need to be root – it installs in ~/.local):

#!/bin/bash

set -u
set -e

DIR=${BASH_COMPLETION_USER_DIR:-${XDG_DATA_HOME:-$HOME/.local/share}/bash-completion}/completions

mkdir -p ${DIR}

cp _myprogram ${DIR}

The actual completion script (_myprogram) it installs looks like this:

_myprogram_commands()
{
    local cur prev opts
    COMPREPLY=()
    cur="${COMP_WORDS[COMP_CWORD]}"
    prev="${COMP_WORDS[COMP_CWORD-1]}"
    opts=$(bash -c "./myprogram --commands")

    COMPREPLY=( $(compgen -W "${opts}" -- ${cur}) )
    return 0
}
complete -F _myprogram_commands ./myprogram

Installing

To install it, run:

./install-bash-completion

Then log out and log in again.

Now when you type ./myprogram and press TAB a couple of times, you should see the possible completions listed.

Notes

The completion script must be named to match the program name, with a leading underscore.

If I wanted it to work when it was installed in my PATH, I would need to change ./myprogram to just myprogram in 2 places.

Notice the line opts=$(bash -c "./myprogram --commands") – it actually runs my program to get the list of completions. This means my program needs to accept a --commands option which prints the valid commands. Alternatively, I could have hard-coded it by replacing that line with just:

opts="cmd1 cmd2 --help --etc"

More info: