Convert a video to a GIF with reasonable colours

Andy Balaam from Andy Balaam's Blog

Here’s a little script I wrote to avoid copy-pasting the ffmpeg command from superuser every time I needed it.

It converts a video to a GIF file by pre-calculating a good palette, then using that palette.

Usage:

./to_gif input.mp4 output.gif

The file to_gif (which should be executable):

#!/bin/bash

set -e
set -u

# Credit: https://superuser.com/questions/556029/how-do-i-convert-a-video-to-gif-using-ffmpeg-with-reasonable-quality

INPUT="$1"
OUTPUT="$2"

PALETTE=$(tempfile --suffix=.png)

ffmpeg -y -i "${INPUT}" -vf palettegen "${PALETTE}"
ffmpeg -y -i "${INPUT}" -i "${PALETTE}" \
    -filter_complex "fps=15,paletteuse" "${OUTPUT}"

rm -f "${PALETTE}"

Note: you might want to modify the number after fps= to adjust how fast the video plays.

Gradle: what is a task, and how can I make a task depend on another task?

Andy Balaam from Andy Balaam's Blog

In an insane world, Gradle sometimes seems like the sanest choice for building a Java or Kotlin project. But what on Earth does all the stuff inside build.gradle actually mean? And when does my code run? And how do you make a task? And how do you persuade a task to depend on another task?

Setting up

To use Gradle, get hold of any version of it for long enough to create a local gradlew file, and the use that.
$ mkdir gradle-experiments
$ cd gradle-experiments
$ sudo apt install gradle  # Briefly install the system version of gradle
...
$ gradle wrapper --gradle-version=5.2.1
$ sudo apt remove gradle   # Optional - uninstalls the system version
$ ./gradlew tasks
... If all is good, this should ...
... print a list of available tasks. ...
It is normal for gradlew and the whole gradle directory it creates to be checked into source control. This means everyone who fetches the code from source control will have a predictable Gradle version.

What is build.gradle?

build.gradle is a Groovy program that Gradle runs within a context that it has set up for you. That context means that you are actually calling methods of a Project object, and modifying its properties. The fact that Groovy lets you miss out a lot of punctuation makes that harder to see, but it's true. The first thing to get your head around is that Gradle actually runs your code immediately, so if your build.gradle looks like this (and only this):
println("Hello")
when you run Gradle your code runs:
$ ./gradlew -q 
Hello
... more guff ...
So that code runs even if you don't ask Gradle to run a task containing that code. It runs at "configuration time" - i.e. when Gradle is understanding your build.gradle file. Actually, "understanding" it means executing it. Remember when I said this code runs in the context of a Project? What that means is that if you have something like this in your build.gradle:
repositories {
    jcenter()
}
what it really means is something like this:
project.repositories(
    {
        it.jcenter()
    }
)
You are calling the repositories method on the project object. The argument to the repositories method is a Groovy closure, which is a blob of code that will get run later. I've used the magic it name above to demonstrate that jcenter is just a method being called on the object that is the context for the closure when it is run. When does it run? Let's find out:
println("before")
project.repositories( {
    println("within")
    jcenter()
})
println("after")
$ ./gradlew -q
before
within
after
... more guff ...
This surprised me - it means the closure you pass in to repositories is actually run immediately, as part of running repositories, before execution gets to the line after that call. As we'll see later, some closures you create do not run immediately like this one. Once you know that build.gradle is actually modifying a Project object, you have starting point for understanding the Gradle reference documentation.

How do you make a task

You probably shouldn't do it very often, but it was instructive for me to understand how to make my own custom task. Here's an example:
tasks.register("mytask") {
    doLast {
        println("running mytask")
    }
}
This creates a new task by calling the register method on the tasks property of the Project object. Register takes two arguments: a name for the task ("mytask" here), and a closure with some code in it to run when we decide we need this task. That closure gets run in a context that can't see the Project object, but instead can see a Task object which it is helping to make. That Task object has a doLast method that we call, and passing it a closure that will be run when the task is actually executed (not immediately). If we remove some of the syntactic sugar the above build.gradle looks like this:
tasks.register(
    "mytask",
    {
        it.doLast {
            println("running mytask")
        }
    }
)
Above we can see that register really does take two arguments as I said above - the first version uses a Groovy feature where if you miss out the last argument and write a closure immediately afterwards the closure is passed as the last argument. Confusing, eh? Again, notice that doLast is a method on the Task object that is implicitly available when the closure is run. So we have created a task that we can run:
 ./gradlew -q mytask
running mytask

How do you make a task depend on another task?

If I want to run my code formatting before my compile (for example) I sometimes need to modify a task to make it depend on another one. This can done for tasks you create or for pre-existing ones. Here's an example:
plugins {
    id "java"
}
tasks.register("mytask") {
    doLast {
        println("running mytask")
    }
}
compileJava {
    dependsOn tasks.named("mytask")
}
So, calling the plugins on the Project at the top with a closure that ran the id method on something modified the Project so that it had a new method called compileJava which we called at the bottom, passing it a closure to run. That closure ran in the context of a Task object (similar to when we created a task, but now allow us to modify a pre-existing one). We called the dependsOn method of the Task object, passing in another Task object which we had got by calling the named method on the tasks object. [Side note: the register method actually returns a Task object that we could have passed to dependsOn without looking it up again using named, but Groovy doesn't provide a very convenient way of holding on to that reference, so we did do it. The Kotlin example below shows that this is quite simple in Kotlin.]

How do I do all this in Kotlin?

Because one DSL that hides what's really going on wasn't enough for you, Gradle now provides a second DSL that hides what's going on in subtly different ways, which is a program written in Kotlin instead of Groovy. This is marginally better, because Kotlin doesn't let you do quite so many stupid tricks as Groovy does. Below are all our examples in Kotlin. You get started exactly the same way, by following "Setting up" above. Remember to name your build file build.gradle.kts.

Say hello in Gradle Kotlin

println("Hello")
This is identical to the Groovy version.)

Use jcenter repo in Gradle Kotlin

repositories {
    jcenter()
}
This is identical to the Groovy version, and with the same meaning: repositories is a method on the implicitly-available Project object. The "unsugared" version looks like this in Kotlin:
this.repositories(
    {
        this.jcenter()
    }
)
[Note that the word this is used to access the implicit context. The word it has a different meaning in Kotlin from in Groovy. In Groovy it means the implicit context, but in Kotlin it means the first argument. We didn't pass any arguments to jcenter when we called it, so we can't use it, but we were being run in a context, which we can refer to using this. Simple. huh?]

Execution order in Gradle Kotlin

We this build.gradle.kts:
println("before")
project.repositories( {
    println("within")
    jcenter()
})
println("after")
We see this behaviour:
$ ./gradlew -q
before
within
after
which is all identical to the Groovy version.

Making a new task in Gradle Kotlin

tasks.register("mytask") {
    doLast {
        println("running mytask")
    }
}
This is identical to the Groovy version, but slightly different when unsugared:
tasks.register(
    "mytask",
    {
        this.doLast(
            {
                println("running mytask")
            }
        )
    }
)
Notice that Kotlin lets you do the same trick as Groovy: providing an extra argument to a function that is a closure by writing it immediately after it looks like you've finished calling it. It's good for people who dislike closing brackets hanging around longer than they're welcome. As someone who likes Lisp, I'm OK with it, but what do I know?

One task depending on another in Gradle Kotlin

plugins {
    java
}
val mytask = tasks.register("mytask") {
    doLast {
        println("running mytask")
    }
}
tasks.compileJava {
    dependsOn(mytask)
}
This differs slightly from the Groovy version, even though the meaning is the same: we start off in the context of a Project object that we call methods on. The code to make one task depend on another gets hold of the Task object called compileJava from inside the tasks property of the Project, and calls it (because it's a callable object). We pass in a closure that runs in the context of this Task object, calling its dependsOn method, and passing in a reference to the mytask object, which is a Task and was created in the code above.

Corrections and clarifications welcome

The above is what I have worked out by experimentation and trying to read the Gradle documentation. Please add comments that clear up confusions and correct mistakes.

Keybase chat bot in 10 lines of bash

Andy Balaam from Andy Balaam's Blog

I’ve been getting very excited about keybase.io recently, not least because it offers secure conversation, and you can have bots.

I wrote a quick bot to simulate Arnold Schwarzenegger which I thought I’d share to demonstrate how easy it is. It is based on the keybase command line tool (which comes with the desktop client as standard) and jq, the brilliant command-line JSON manipulator.

For this to work, you need to have the keybase command installed and working, and you need jq.

Here’s the bot:

#!/bin/bash
CHANNEL=mychannel
keybase chat api-listen | while read L; do
{
    OUT=$(jq --raw-output 'select(.type == "chat")|select(.msg.content.text.body|startswith("!arnie "))| .msg.content.text.body | "*" + ltrimstr("!arnie ") + "*"' <<< "$L")
    if [ "${OUT}" != "" ]; then
    {
        keybase chat send "${CHANNEL}" "${OUT}"
    }; fi
}; done

and here's it working:

andy> !arnie Do eet do eet now!!!
andy> Do eet do eet now!!!

Note: here the bot is pretending to be me. To do this nicely, you will want a different account for the bot, but you get the idea.

Obviously, I am now working on a comprehensive bot framework in Rust. Watch this space.

Performance of Java 2D drawing operations (part 3: image opacity)

Andy Balaam from Andy Balaam&#039;s Blog

Series: operations, images, opacity

Not because I was enjoying it, I seemed compelled to continue my quest to understand the performance of various Java 2D drawing operations. I’m hoping to make my game Rabbit Escape faster, especially on the Raspberry Pi, so you may see another post sometime actually trying this stuff out on a Pi.

But for now, here are the results of my investigation into how different patterns of opacity in images affects rendering performance.

You can find the code here: gitlab.com/andybalaam/java-2d-performance.

Results

  • Images with partially-opaque pixels are no slower than those with fully-opaque pixels
  • Large transparent areas in images are drawn quite quickly, but transparent pixels mixed with non-transparent are slow

Advice

  • Still avoid any transparency whenever possible
  • It’s relatively OK to use large transparent areas on images (e.g. a fixed-size animation where a character moves through the image)
  • Don’t bother restricting pixels to be either fully transparent or fully opaque – partially-opaque is fine

Opacity patterns in images

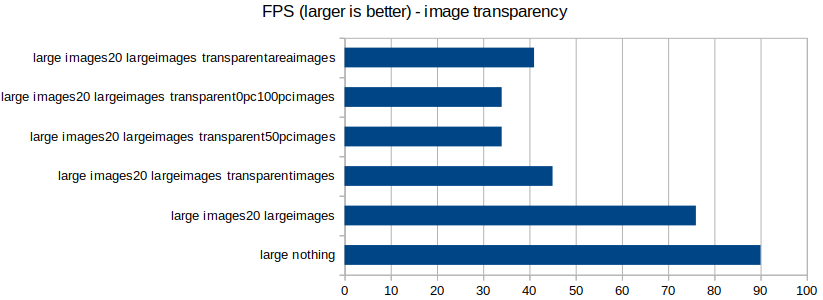
Non-transparent images drew at 76 FPS, and transparent ones dropped to 45 FPS.

I went further into investigating transparency by creating images that were:

  • All pixels 50% opacity (34 FPS)
  • Half pixels 0% opacity, half 100%, mixed up (34 FPS)
  • Double the size of the original image, but the extra area is fully transparent, and the original area is non-transparent (41 FPS)

I concluded that partial-opacity is not important to performance compared with full-opacity, but that large areas of transparency are relatively fast compared with images with complex patterns of transparency and opacity.

Numbers

Transparency and opacity

Test FPS
large nothing 90
large images20 largeimages 76
large images20 largeimages transparentimages 45
large images20 largeimages transparent50pcimages 34
large images20 largeimages transparent0pc100pcimages 34
large images20 largeimages transparentareaimages 41

Feedback please

Please do get back to me with tips about how to improve the performance of my experimental code.

Feel free to log issues, make merge requests or add comments to the blog post.

Performance of Java 2D drawing operations (part 2: image issues)

Andy Balaam from Andy Balaam&#039;s Blog

Series: operations, images

In my previous post I examined the performance of various drawing operations in Java 2D rendering. Here I look at some specifics around rendering images, with an eye to finding optimisations I can apply to my game Rabbit Escape.

You can find the code here: gitlab.com/andybalaam/java-2d-performance.

Results

  • Drawing images with transparent sections is very slow
  • Drawing one large image is slower than drawing many small images covering the same area(!)
  • Drawing images outside the screen is slower than not drawing them at all (but faster than drawing them onto a visible area)

Advice

  • Avoid transparent images where possible
  • Don’t bother pre-rendering your background tiles onto a single image
  • Don’t draw images that are off-screen

Images with transparency

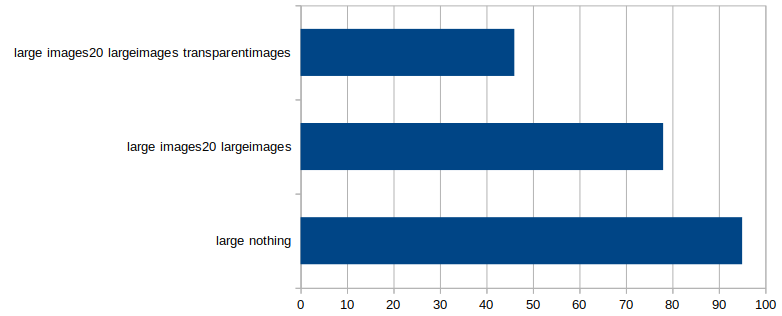
All the images I used were PNG files with a transparency layer, but in most of my experiments there were no transparent pixels. When I used images with transparent pixels the frame rate was much slower, dropping from 78 to 46 FPS. So using images with transparent pixels causes a significant performance hit.

I’d be grateful if someone who knows more about it can recommend how to improve my program to reduce this impact – I suspect there may be tricks I can do around setComposite or setRenderingHint or enabling/encouraging hardware acceleration.

Composite images

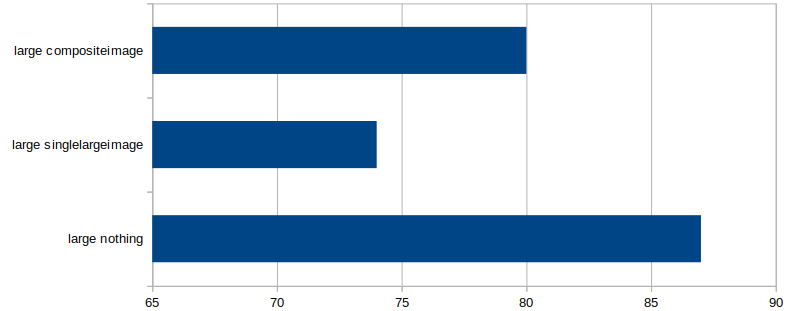
I assumed that drawing a single image would be much faster than covering the same area of the screen by drawing lots of small images. In fact, the result was the opposite: drawing lots of small images was much faster than drawing a single image covering the same area.

The code for a single image is:

g2d.drawImage(
    singleLargeImage,
    10,
    10,
    null
)

and for the small images it is:

for (y in 0 until 40)
{
    for (x in 0 until 60)
    {
        g2d.drawImage(
            compositeImages[(y*20 + x) % compositeImages.size],
            10 + (20 * x),
            10 + (20 * y),
            null
        )
    }
}

The single large image was rendered at 74 FPS, whereas covering the same area using repeated copies of 100 images was rendered at 80 FPS. I ran this test several times because I found the result surprising, and it was consistent every time.

I have to assume some caching (possibly via accelerated graphics) of the small images is the explanation.

Drawing images off the side of the screen

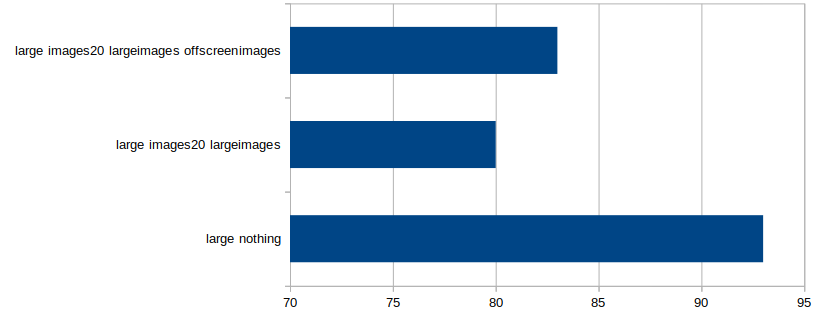
Drawing images off the side of the screen was faster than drawing them in a visible area, but slower than not drawing them at all. I tested this by adding 10,000 to the x and y positions of the images being drawn (I also tested subtracting 10,000 with similar results). Not drawing any images ran at 93 FPS, drawing images on-screen at 80 FPS, and drawing them off-screen only 83 FPS, meaning drawing images off the side takes significant time.

Advice: check whether images are on-screen, and avoid drawing them if not.

Numbers

Transparency

Test FPS
large nothing 95
large images20 largeimages 78
large images20 largeimages transparentimages 46

Composite images

(Lots of small images covering an area, or a single larger image.)

Test FPS
large nothing 87
large largesingleimage 74
large compositeimage 80

Offscreen images

Test FPS
large nothing 93
large images20 largeimages 80
large images20 largeimages offscreenimages 83

Feedback please

Please do get back to me with tips about how to improve the performance of my experimental code.

Feel free to log issues, make merge requests or add comments to the blog post.

Performance of Java 2D drawing operations

Andy Balaam from Andy Balaam&#039;s Blog

I want to remodel the desktop UI of my game Rabbit Escape to be more
convenient and nicer looking, so I took a new look at game-loop-style graphics rendering onto a canvas in a Java 2D (Swing) UI.

Specifically, how fast can it be, and what pitfalls should I avoid when I’m doing it?

Results

  • Larger windows are (much) slower
  • Resizing images on-the-fly is very slow, even if they are the same size every time
  • Drawing small images is fast, but drawing large images is slow
  • Drawing rectangles is fast
  • Drawing text is fast
  • Drawing Swing widgets in front of a canvas is fast
  • Creating fonts on-the-fly is a tiny bit slow

Code

You can find the full code (written in Kotlin) at gitlab.com/andybalaam/java-2d-performance.

Basically, we make a JFrame and a Canvas and tell them not to listen to repaints (i.e. we control their drawing).

val app = JFrame()
app.ignoreRepaint = true
val canvas = Canvas()
canvas.ignoreRepaint = true

Then we add any buttons to the JFrame, and the canvas last (so it displays behind):

app.add(button)
app.add(canvas)

Now we make the canvas double-buffered and get hold of a buffer image for it:

app.isVisible = true
canvas.createBufferStrategy(2)
val bufferStrategy = canvas.bufferStrategy
val bufferedImage = GraphicsEnvironment
    .getLocalGraphicsEnvironment()
    .defaultScreenDevice
    .defaultConfiguration
    .createCompatibleImage(config.width, config.height)

Then inside a tight loop we draw onto the buffer image:

val g2d = bufferedImage.createGraphics()
try
{
    g2d.color = backgroundColor
    g2d.fillRect(0, 0, config.width, config.height)

    ... the different drawing operations go here ...

and then swap the buffers:

    val graphics = bufferStrategy.drawGraphics
    try {
        graphics.drawImage(bufferedImage, 0, 0, null)
        if (!bufferStrategy.contentsLost()) {
            bufferStrategy.show()
        }
    } finally {
        graphics.dispose()
    }
} finally {
    g2d.dispose()
}

Results

Baseline: some rectangles

I decided to compare everything against drawing 20 rectangles at random points on the screen, since that seems like a minimal requirement for a game.

My test machine is an Intel Core 2 Duo E6550 2.33GHz with 6GB RAM and a GeForce GT 740 graphics card (I have no idea whether it is being used here – I assume not). I am running Ubuntu 18.04.1 Linux, OpenJDK Java 1.8.0_191, and Kotlin 1.3.20-release-116. (I expect the results would be identical if I were using Java rather than Kotlin.)

I ran all the tests in two window sizes: 1600×900 and 640×480. 640.×480 was embarrassingly fast for all tests, but 1600×900 struggled with some of the tasks.

Drawing rectangles looks like this:

g2d.color = Color(
    rand.nextInt(256),
    rand.nextInt(256),
    rand.nextInt(256)
)
g2d.fillRect(
    rand.nextInt(config.width / 2),
    rand.nextInt(config.height / 2),
    rand.nextInt(config.width / 2),
    rand.nextInt(config.height / 2)
)

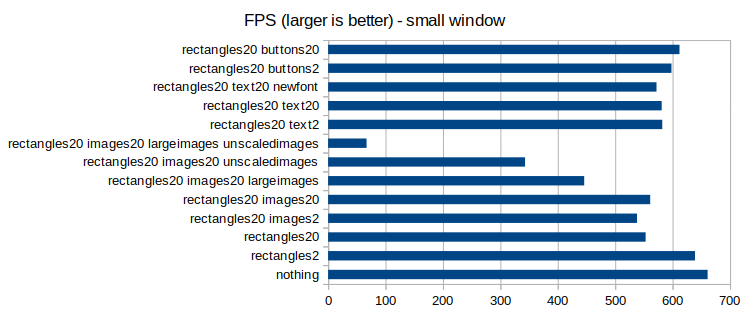
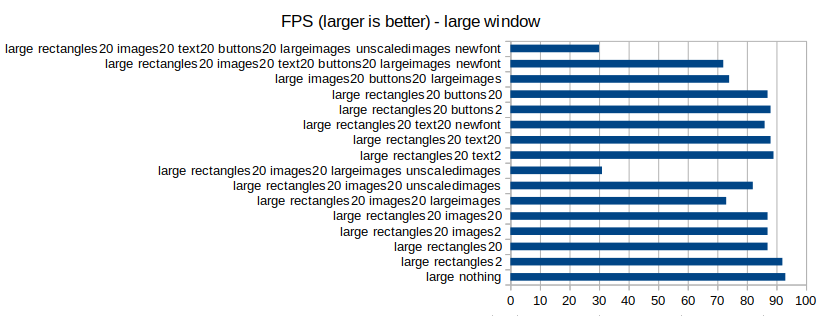
In the small window, the baseline (20 rectangles) ran at 553 FPS. In the large window it ran at 87 FPS.

I didn’t do any statistics on these numbers because I am too lazy. Feel free to do it properly and let me know the results – I will happily update the article.

Fewer rectangles

When I reduced the number of rectangles to do less drawing work, I saw small improvements in performance. In the small window, drawing 2 rectangles instead of 20 increased the frame rate from 553 to 639, but there is a lot of noise in those results, and other runs were much closer. In the large window, the same reduction improved the frame rate from 87 to 92. This is not a huge speed-up, showing that drawing rectangles is pretty fast.

Adding fixed-size images

Drawing pre-scaled images looks like this:

g2d.drawImage(
    image,
    rand.nextInt(config.width),
    rand.nextInt(config.height),
    null
)

When I added 20 small images (40×40 pixels) to be drawn in each frame, the performance was almost unchanged. In the small window, the run showing 20 images per frame (as well as rectangle) actually ran faster than the one without (561 FPS versus 553), suggesting the difference is negligible and I should do some statistics. In the large window, the 20 images version ran at exactly the same speed (87 FPS).

So, it looks like drawing small images costs almost nothing.

When I moved to large images (400×400 pixels), the small window slowed down from 553 to 446 FPS, and the large window slowed from 87 to 73 FPS, so larger images clearly have an impact, and we will need to limit the number and size of images to keep the frame rate acceptable.

Scaling images on the fly

You can scale an image on the fly as you draw onto a Canvas. (Spoiler: don’t do this!)

My code looks like:

val s = config.imageSize
val x1 = rand.nextInt(config.width)
val y1 = rand.nextInt(config.height)
val x2 = x1 + s
val y2 = y1 + s
g2d.drawImage(
    unscaledImage,
    x1, y1, x2, y2,
    0, 0, unscaledImageWidth, unscaledImageHeight,
    null
)

Note the 10-argument form of drawImage is being used. You can be sure you have avoided this situation if you use the 4-argument form from the previous section.

Note: the resulting image is the same size every time, and the Java documentation implies that scaled images may be cached by the system, but I saw a huge slow-down when using the 10-argument form of drawImage above.

On-the-fly scaled images slowed the small window from 446 to 67 FPS(!), and the large window from 73 to 31 FPS, meaning the exact same rendering took over twice as long.

Advice: check you are not using one of the drawImage overloads that scales images! Pre-scale them yourself (e.g. with getScaledInstance as I did here).

Displaying text

Drawing text on the canvas like this:

g2d.font = Font("Courier New", Font.PLAIN, 12)
g2d.color = Color.GREEN
g2d.drawString("FPS: $fpsLastSecond", 20, 20 + i * 14)

had a similar impact to drawing small images – i.e. it only affected the performance very slightly and is generally quite fast. The small window slowed from 553 to 581 FPS, and the large window from 87 to 88.

Creating the font every time (as shown above) slowed the process a little more, so it is worth moving the font creating out of the game loop and only doing it once. The slowdown just for creating the font was 581 to 572 FPS in the small window, and 88 to 86 FPS in the large.

Swing widgets

By adding Button widgets to the JFrame before the Canvas, I was able to display them in front. Their rendering and focus worked as expected, and they had no impact at all on performance.

The same was true when I tried adding these widgets in front of images rendered on the canvas (instead of rectangles).

Turning everything up to 11

When I added everything I had tested all at the same time: rectangles, text with a new font every time, large unscaled images, and large window, the frame rate reduced to 30 FPS. This is a little slow for a game already, and if we had more images to draw it could get even worse. However, when I pre-scaled the images the frame rate went up to 72 FPS, showing that Java is capable of running a game at an acceptable frame rate on my machine, so long as we are careful how we use it.

Numbers

Small window (640×480)

Test FPS
nothing 661
rectangles2 639
rectangles20 553
rectangles20 images2 538
rectangles20 images20 561
rectangles20 images20 largeimages 446
rectangles20 images20 unscaledimages 343
rectangles20 images20 largeimages unscaledimages 67
rectangles20 text2 582
rectangles20 text20 581
rectangles20 text20 newfont 572
rectangles20 buttons2 598
rectangles20 buttons20 612

Large window (1200×900)

Test FPS
large nothing 93
large rectangles2 92
large rectangles20 87
large rectangles20 images2 87
large rectangles20 images20 87
large rectangles20 images20 largeimages 73
large rectangles20 images20 unscaledimages 82
large rectangles20 images20 largeimages unscaledimages 31
large rectangles20 text2 89
large rectangles20 text20 88
large rectangles20 text20 newfont 86
large rectangles20 buttons2 88
large rectangles20 buttons20 87
large images20 buttons20 largeimages 74
large rectangles20 images20 text20 buttons20 largeimages newfont 72
large rectangles20 images20 text20 buttons20 largeimages unscaledimages newfont 30

Feedback please

Please do get back to me with tips about how to improve the performance of my experimental code.

Feel free to log issues, make merge requests or add comments to the blog post.

London Python Meetup January 2019 – Async Python and GeoPandas

Andy Balaam from Andy Balaam&#039;s Blog

It was a pleasure to go to the London Python Meetup organised by @python_london. There were plenty of friendly people and interesting conversations.

I gave a talk “Making 100 million requests with Python aiohttp” (slides) explaining the basics of writing async code in Python 3 and how I used that to make a very large number of HTTP requests.

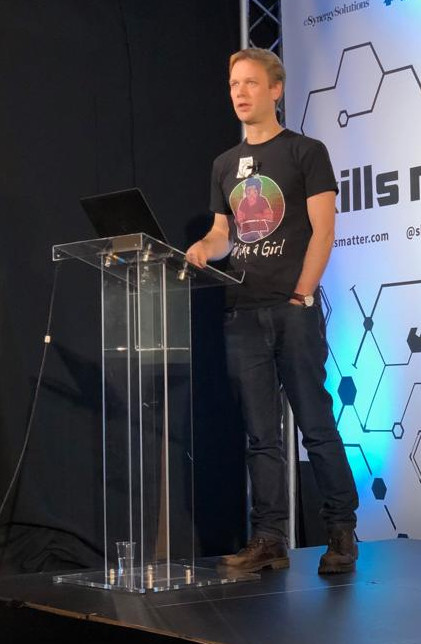
Andy giving the presentation

(Photo by CB Bailey.)

Hopefully it was helpful – there were several good questions, so I am optimistic that people were engaged with it.

After that, there was an excellent talk by Gareth Lloyd called “GeoPandas, the geospatial extension for Pandas” in which he explained how to use the very well-developed geo-spatial data tools available in the Python ecosphere to transform, combine, plot and analyse data which includes location information. I was really impressed with how easy the libraries looked to use, and also with the cool Jupyter notebook Gareth used to explain the ideas using live demos.

London Python Meetups seem like a cool place to meet Pythonistas of all levels of experience in a nice, low-pressure environment!

Meetup link: aiohttp / GeoPandas

Run bash inside any version of Linux using Docker

Andy Balaam from Andy Balaam&#039;s Blog

Docker is useful for some things, and not as useful as you think for others.

Here’s something massively useful: get a throwaway bash prompt inside any version of any Linux distribution in one command:

docker run -i -t --mount "type=bind,src=$HOME/Desktop,dst=/Desktop" ubuntu:18.10 bash

This command downloads a recent Ubuntu 18.10 image, mounts my desktop as /Desktop in the container, and gives me a bash prompt. From here I can install any packages I want and then use them.

For example, today I used it to decrypt a file that was encrypted with a cipher my main OS did not have a package for.

When I exit bash, the container stops and I can find it with docker ps -a then remove it with docker rm. To really clean up I can find the downloaded images with docker image ls and remove them with docker image rm.