What to cache when building Rust using Gitlab CI or similar

Andy Balaam from Andy Balaam's Blog

When building your project with Gitlab CI or a similar build tool, you can end up spending a lot of time watching your build repeat the same steps over and over. This is especially frustrating when it mostly consists of downloading and compiling the same things we downloaded and compiled last time.

To mitigate this, we can ask Gitlab CI to cache things that will be the same next time.

For a Rust project, the most important thing to cache is target in the local directory.

But, if you are installing tools using rustup or cargo, it will really help if you cache those too. Fortunately, Rust knows where those are by using environment variables, and these are defined in the standard Rust Docker image.

We can make sure we’re caching as much as possible by adding a section like this to .gitlab-ci.yml:

    cache:
        key: shared-cache
        paths:
            - target/
            - $CARGO_HOME/
            - $RUSTUP_HOME/

If you add this to all your jobs, they will share a single cache between them, and cache the local target directory as well as any tools installed with rustup or cargo.

Here is a full example from my Evolve SVGs project:

image: rust:latest

before_script:
    - rustup component add rustfmt
    - rustup target add wasm32-unknown-unknown
    - cargo install trunk wasm-bindgen-cli

pages:
    stage: deploy
    script:
        - echo "Publishing pages to" $CI_PAGES_URL
        - make deploy
        - mv dist public
    artifacts:
      paths:
        - public
    only:
        - main
    cache:
        key: shared-cache
        paths:
            - target/
            - $CARGO_HOME/
            - $RUSTUP_HOME/

test:
    stage: test
    script:
        - make test
    cache:
        key: shared-cache
        paths:
            - target/
            - $CARGO_HOME/
            - $RUSTUP_HOME/

Minimal example of a Maven pom for a mixed Kotlin and Java project

Andy Balaam from Andy Balaam's Blog

The Kotlin docs describe some things you need in your pom.xml to create a project that is a mix of Kotlin and Java code, but there is no complete example, so here is mine:

pom.xml:

<project>
    <modelVersion>4.0.0</modelVersion>

    <groupId>com.example.kj</groupId>
    <artifactId>kotlin-and-java</artifactId>
    <version>1.0.0-SNAPSHOT</version>

    <properties>
        <kotlin.version>1.5.21</kotlin.version>
        <project.build.sourceEncoding>UTF-8</project.build.sourceEncoding>
        <project.reporting.outputEncoding>UTF-8</project.reporting.outputEncoding>
    </properties>

    <build>
        <plugins>
            <plugin>
                <groupId>org.jetbrains.kotlin</groupId>
                <artifactId>kotlin-maven-plugin</artifactId>
                <version>${kotlin.version}</version>
                <executions>
                    <execution>
                        <id>compile</id>
                        <goals>
                            <goal>compile</goal>
                        </goals>
                        <configuration>
                            <sourceDirs>
                                <sourceDir>${project.basedir}/src/main/kotlin</sourceDir>
                                <sourceDir>${project.basedir}/src/main/java</sourceDir>
                            </sourceDirs>
                        </configuration>
                    </execution>
                    <execution>
                        <id>test-compile</id>
                        <goals> <goal>test-compile</goal> </goals>
                        <configuration>
                            <sourceDirs>
                                <sourceDir>${project.basedir}/src/test/kotlin</sourceDir>
                                <sourceDir>${project.basedir}/src/test/java</sourceDir>
                            </sourceDirs>
                        </configuration>
                    </execution>
                </executions>
            </plugin>
            <plugin>
                <groupId>org.apache.maven.plugins</groupId>
                <artifactId>maven-compiler-plugin</artifactId>
                <version>3.5.1</version>
                <executions>
                    <!-- Replacing default-compile as it is treated specially by maven -->
                    <execution>
                        <id>default-compile</id>
                        <phase>none</phase>
                    </execution>
                    <!-- Replacing default-testCompile as it is treated specially by maven -->
                    <execution>
                        <id>default-testCompile</id>
                        <phase>none</phase>
                    </execution>
                    <execution>
                        <id>java-compile</id>
                        <phase>compile</phase>
                        <goals>
                            <goal>compile</goal>
                        </goals>
                    </execution>
                    <execution>
                        <id>java-test-compile</id>
                        <phase>test-compile</phase>
                        <goals>
                            <goal>testCompile</goal>
                        </goals>
                    </execution>
                </executions>
            </plugin>
        </plugins>
    </build>
    <dependencies>
        <dependency>
            <groupId>org.jetbrains.kotlin</groupId>
            <artifactId>kotlin-stdlib</artifactId>
            <version>${kotlin.version}</version>
        </dependency>
    </dependencies>
</project>

src/main/java/MyJava.java:

public class MyJava {
    public static void main(String[] args) {
        MyKotlin k = new MyKotlin();  // Use Kotlin from Java
        System.out.println(k.message());
    }
}

src/main/kotlin/MyKotlin.kt:

class MyKotlin : MyJava() {  // Use Java from Kotlin
    fun message(): String {
        return "Hello from Kotlin!"
    }
}

src/test/java/MadeInJavaTest.java:

class MadeInJavaTest {
    public void testCanUseJava() {
        MyJava j = new MyJava();
    }

    public void testCanUseKotlin() {
        MyKotlin k = new MyKotlin();
        assertEquals(k.message(), "Hello from Kotlin!");
    }

    static void assertEquals(String left, String right) {
        if (!left.equals(right)) {
            throw new AssertionError(left + " != " + right);
        }
    }
}

src/test/kotlin/MadeInKotlinTest.kt:

class MadeInKotlinTest {
    fun testCanUseJava() {
        MyJava()
    }

    fun testCanUseKotlin() {
        val k = MyKotlin();
        assertEquals(k.message(), "Hello from Kotlin!");
    }
}

fun assertEquals(left: String, right: String) {
    if (left != right) {
        throw AssertionError("${left} != ${right}");
    }
}

Importing/migrating from one peertube server to another

Andy Balaam from Andy Balaam&#039;s Blog

My Peertube server is shutting down, so I need to move my videos to another one. The official scripts don’t seem to cover this case very well, so here is what I did.

My script fetches videos and their details and uploads them to the new server via the Peertube API.

Contributions welcome: I was not able to copy video descriptions across, and I was too lazy so I hard-coded the number of tags. Also, I didn’t make a git repo for all this because I felt it needs more thought, but feel free to start one and I will happily contribute this.

This script copies all videos in a single Peertube channel to a different server. You must find the numeric ID of the channel on the new server to copy into, which I did by looking at the responses in the Network tab of Firefox’s developer tools when I clicked on its name in the web interface. It requires bash, curl, youtube-dl and jq.

Here’s peertube-migrate-channel.bash:

#!/bin/bash

set -u
set -e

# Modify these for your setup
OLD_SERVER="INSERT OLD SERVER e.g. https://peertube.social"
OLD_CHANNEL="INSERT CHANNEL URL-NAME e.g. trials_fusion"
NEW_SERVER="INSERT NEW SERVER e.g. https://video.hardlimit.com"
NEW_CHANNEL="INSERT NEW CHANNEL ID e.g. 4103"
USERNAME="INSERT_USERNAME for new server e.g. trials"
PASSWORD="INSERT PASSWORD for new server"
TAG1="INSERT_A_TAG e.g trials"
TAG2="INSERT_A_TAG e.g. gaming"
TAG3="INSERT_A_TAG e.g. gameing"

DIR=$(mktemp -d)
API_PATH="${NEW_SERVER}/api/v1"

# Find out how many videos are in the channel
curl -s \
    "${OLD_SERVER}/api/v1/video-channels/${OLD_CHANNEL}/videos/?count=1" \
    > "${DIR}/videos-total.json"

TOTAL=$(jq .total < "${DIR}/videos-total.json")
CURRENT=0
PAGE_SIZE=10

# Get a list of URLS for all the videos

echo -n "" > "${DIR}/urls.txt"

while (( CURRENT < TOTAL )); do
    FILE="${DIR}/videos-page-${CURRENT}.json"

    curl -s \
        "${OLD_SERVER}/api/v1/video-channels/${OLD_CHANNEL}/videos/?start=${CURRENT}&count=${PAGE_SIZE}&skipCount=true" \
        > "${FILE}"

    jq ".data | map(.uuid) | .[]" -r < "${FILE}" >> "${DIR}/urls.txt"

    CURRENT=$((CURRENT + PAGE_SIZE))
done

# Log in to the new server

client_id=$(curl -s "${API_PATH}/oauth-clients/local" | jq -r ".client_id")
client_secret=$(curl -s "${API_PATH}/oauth-clients/local" | jq -r ".client_secret")
token=$(curl -s "${API_PATH}/users/token" \
  --data client_id="${client_id}" \
  --data client_secret="${client_secret}" \
  --data grant_type=password \
  --data response_type=code \
  --data username="${USERNAME}" \
  --data password="${PASSWORD}" \
  | jq -r ".access_token")

# Download and upload each video

tac "${DIR}/urls.txt" \
    | while read ID; do
        URL="${OLD_SERVER}/api/v1/videos/${ID}"
        curl -s "${URL}" > "${DIR}/info-${ID}.json"
        NAME=$(jq -r .name < "${DIR}/info-${ID}.json")
        CATEGORY=$(jq -r .category.id < "${DIR}/info-${ID}.json")
        LICENCE=$(jq -r .licence.id < "${DIR}/info-${ID}.json")
        LANGUAGE=$(jq -r .language.id < "${DIR}/info-${ID}.json")
        PRIVACY=$(jq -r .privacy.id < "${DIR}/info-${ID}.json")

        OLD_VIDEO="https://peertube.social/videos/watch/${ID}"
	mkdir "${DIR}/dl-${ID}"
	youtube-dl "${OLD_VIDEO}" --output="${DIR}/dl-${ID}/dl.mp4"

        echo "Uploading ${OLD_VIDEO}"
        curl "${API_PATH}/videos/upload" \
	  --silent \
          -H "Authorization: Bearer ${token}" \
          --output "${DIR}/curl-out-${ID}.txt" \
          --max-time 6000 \
	  --form name="${NAME}" \
	  --form videofile=@"${DIR}/dl-${ID}/dl.mp4" \
          --form channelId=${NEW_CHANNEL} \
          --form category=${CATEGORY} \
          --form licence=${LICENCE} \
          --form description="TODO VIDEO DESCRIPTION" \
          --form language=${LANGUAGE} \
          --form privacy=${PRIVACY} \
          --form tags="${TAG1}" \
          --form tags="${TAG2}" \
          --form tags="${TAG3}"
    done

Why write an entire game (including Graphics) in a single, hand-coded JavaScript file?

Andy Balaam from Andy Balaam&#039;s Blog

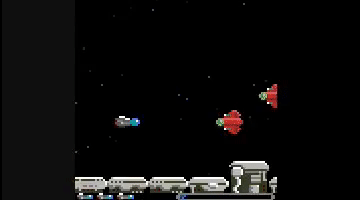
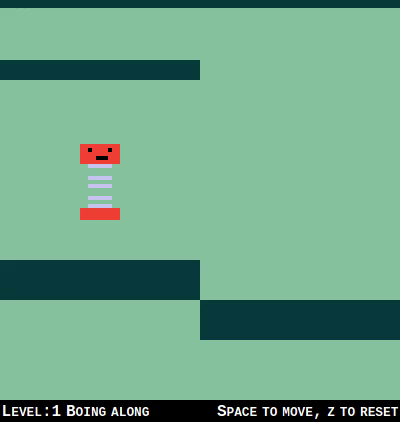
My new game, Rightwaves, is out now! It’s a tribute to the great classic R-Type.

A pixel-art spaceship battles aliens

The entire implementation, including all the graphics, is contained within a single ~5000-line JavaScript file. Why?

This is a terrible idea

Let me start by saying I do not recommend writing code this way. It’s a terrible idea, and some aspects of the development process have been severely hampered by doing this.

A pixellated spaceship dodges bullets and heads for a narrow passageway

Complexity

One of my goals for Smolpxl is to strip coding back to the simplest possible thing it can be.

Over the last 40 years, programming has changed a huge amount: the number and variety of the tools we have to work with has increased beyond what I can take in, and almost all of these things are utterly brilliant.

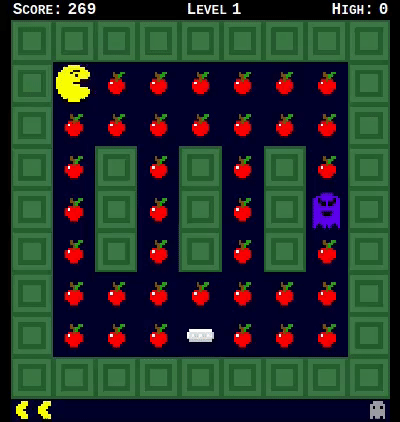
I can’t imagine writing a game like Eat Apples Quick using the line-orientated editor I used on the ZX Spectrum. I thoroughly enjoyed the Rust code completion and documentation I get from running rust-language-server inside NeoVim. (I’ve even heard there are editors that work inside a windowed environment, but I am not brave enough to try one.)

A pacman-like game

I can’t imagine writing the simple physics engine for Spring in assembly language, or trying to concentrate on that while I had to unravel complex graphics rendering conventions and timings. Instead, I was able to write code that looked a bit like the maths it represented, and allow the browser to handle the graphics card.

A spring with a cheery face bounces off a platform

But, along with all these powerful tools like high-level programming languages, fully cross-platform user interface components, and libraries that make writing a game loop simple, comes a new problem: complexity.

We must choose which tools, libraries and paradigms we’re going to use, and to make that choice we need to understand them.

The Smolpxl library makes some of these choices for you, by enforcing an Elm-style model/update/view split, providing a pixellated canvas of known size, and handling a game loop with fixed framerate. This is particularly suited to writing little retro-style games, similar to what I used to write in AMOS Basic on my Amiga.

I want to make everything simple, but I want our game to work on people’s computers. The only platform we can realistically choose is the browser: the exact same code works almost everywhere.

None of this explains why I would write a game inside a single file of source code, but hopefully it begins to demonstrate where I am coming from.

Simplicity

Another goal for Smolpxl is to teach programming, and a huge barrier I see to getting started is the build process.

No build

You can write Smolpxl games in Rust and compile them to WASM (which is how Eat Apples Quick is done), and you could also package the JavaScript with webpack or similar, but I want the first-class way of using Smolpxl to involve no build at all: I want you to be able to copy in a standard index.html and smolpxl.js and then write your code in game.js and have it just work when you double-click on index.html.

A goal for Rightwaves is to demonstrate that you can write a full game in Smolpxl, without stepping outside that simple story: just double-click on index.html.

It’s all inside game.js

So, Rightwaves is a single* JavaScript file containing the code, the level descriptions, and, probably most unusually, the graphics.

* Note: I cheated – the “action-replay” data is in a separate file – it was much bigger than the source code, and would have made it too hard to deal with. If I wanted to stay pure, I would have had to remove the default action replay from the game, but I just liked it too much.

Level design

Many times while I was writing Rightwaves, I wished I had written a level editor. In fact, I am often quoted as saying

“A game without a level editor is only half a game.”
— Andy Balaam, quite often

But instead, the level design is code like this:

const LEVELS = [
    {
        scenery: [
            { x:   0, y: 80, image: "machinery-20x16-01"},
            { x:  20, y: 88, image: "machinery-20x08-01"},
// ... etc.
        ],
        width: 1526,
        aliens: [
            newRedFlat(130, 20),
            newRedFlat(145, 25),
// ... etc.

The full code is at gitlab.com/smolpxl/rightwaves/-/blob/main/public/game.js#L3478.

It’s not a lot of fun to edit, but on the other hand, every time you make a change a simple refresh in the browser lets you see what it really looks like. No build process; no waiting.

Graphics

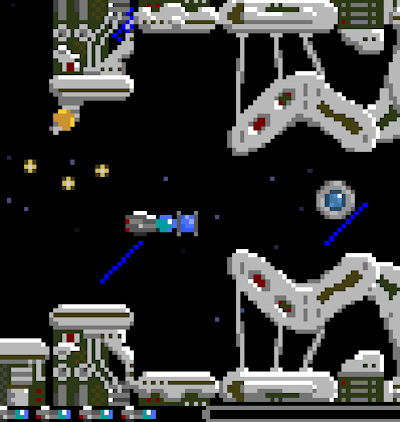
I drew the graphics for Rightwaves using GIMP, exported the images as PNG files, and converted them to text using a little Rust utility I wrote.

When I wanted to change an image, it was a nightmare, and I would recommend this approach to no-one whatsoever.

The reason why Smolpxl supports creating images in the source code is so you can hand-craft them right there, using an ASCII-art style.

Here’s the spaceship: An ASCII-art spaceship

and here is the code for it:

const IMAGES = {
    "ship": {
        pixels: [
            "..www.......",
            "dddddww.bbb.",
            "rllldddcccwb",
            "dddhlllccccb",
            "rddddddaccb.",
            "..aaa......."
        ],
        key: {
            "w": [255, 255, 255],
            "d": [88, 88, 88],
            "b": [77, 111, 249],
            "r": [141, 0, 0],
            "l": [126, 125, 125],
            "h": [192, 192, 192],
            "c": [3, 157, 157],
            "a": [42, 42, 42]
        }
    },
// ... lots, and I do mean lots, more here for the other graphics ...

The full code is at gitlab.com/smolpxl/rightwaves/-/blob/main/public/game.js#L41.

Note that I painstakingly coloured that code in for you, for this blog post. In the code there is no such luxury!

Openness

All the Smolpxl games are Free/Open Source software, of course. By avoiding a build, anyone can see the source code, just as I wrote, it in their browser. Anyone (including me) can debug problems without any extra steps. Putting everything in one file makes it easier to find the code (but probably makes it harder to understand).

Optimisation

Rightwaves loads really fast. On my machine, the first time you visit the page, it is playing within 1.4 seconds, after downloading 5 files at a total of 149kB (gzipped). If we exclude the included action replay, it is much smaller.

All of this, with no build process.

Maybe it wasn’t such a bad idea after all.

This is a bad idea

Don’t try this.

For fun

Except, of course, if you like fun. I tried this because it was fun. I would heartily recommend trying things because they might be fun.

Also, if you like fun, try playing the games on Smolpxl games, or write your own!

A puzzle game, a cross-the-road game, a tunnel game, a snake game, a Heli game, and a game-of-life thingy

Matrix is the only (chat) game in town

Andy Balaam from Andy Balaam&#039;s Blog

On my phone and computer I use WhatsApp, Signal, Slack, Keybase, Discord, IRC, XMPP/Jabber and Element/Matrix. In addition, I occasionally use the messaging features of Mastodon, Twitter and even LinkedIn. I’ve never used Telegram, Line, WeChat, Session, Wire or Status chat, but they exist too, along with many others.

It would be better if I could chat with people using the app I prefer, rather than the one I am forced to use.

Of course, the only useful chat app is the one your friends and family are on, so it’s pointless to debate the finer points in each service’s favour, but here I go anyway.

Only Matrix is:

The importance of decentralisation has been re-emphasised for me this week after the freenode IRC debacle. A single controlling entity, even when it is currently benign (as some people believe Signal is) is not a guarantee that things will stay this way. Thank goodness you can connect your usual IRC network to libera.chat: imagine what would happen to Signal users if they realised someone unscrupulous had acquired control.

Matrix does not solve all our problems. Notably:

  • Its security is probably not good enough for people threatened by powerful interests – at the moment it’s quite easy to see who’s talking to whom, and when.
  • Not all clients support end-to-end encryption, and not all turn it on by default (but the most-used ones do).

Despite these limitations, Matrix is the only chat network that is even attempting to provide what users need, and it seems to be doing a pretty good job of it.

I think we should work together to address its weaknesses, and adopt it wherever we can.

So, I recommend Matrix (specifically element.io) for group and individual chat.

Suspending the computer using Kupfer

Andy Balaam from Andy Balaam&#039;s Blog

I have recently started using Kupfer again as my application launcher in Ubuntu MATE, and I found it lacked the ability to suspend the computer.

Here is the plugin I wrote to support this.

To install it, quit Kupfer, create a directory in your home dir called .local/share/kupfer/plugins, and create this file suspend.py inside:

__kupfer_name__ = _("Power management")
__kupfer_sources__ = ("PowerManagementItemsSource", )
__description__ = _("Actions to suspend the computer")
__version__ = "2021-05-05"
__author__ = "Andy Balaam "


from kupfer.plugin import session_support as support


class Suspend (support.CommandLeaf):
    def __init__(self, commands):
        support.CommandLeaf.__init__(self, commands, "Suspend")
    def get_description(self):
        return _("Suspend the computer")
    def get_icon_name(self):
        return "system-suspend"


class PowerManagementItemsSource (support.CommonSource):
	def __init__(self):
		support.CommonSource.__init__(self, _("Power management"))
	def get_items(self):
		return (Suspend((["systemctl", "suspend"],)),)

# Copyright 2021 Andy Balaam, released under the MIT license.

Now restart Kupfer, go to Preferences, Plugins, and tick “Power management”.

You should now see a “Suspend” item if you search for it in the Kupfer interface.

Inspired by: Mate Session Management – Kupfer Plugin.

Reference docs: Kupfer Plugin API

Uploading to PeerTube from the command line

Andy Balaam from Andy Balaam&#039;s Blog

PeerTube’s API documentation gives an example of how to upload a video, but it is missing a couple of important aspects, most notably how to provide multiple tags use form-encoded input, so my more complete script is below. Use it like this:

# First, make sure jq is installed
echo "myusername" > username
echo "mypassword" > password
./upload "video_file.mp4"

Downsides:

  1. Your username and password are visible via ps to users on the same machine (tips to avoid this are welcome)
  2. I can’t work out how to include newlines in the video description (again, tips welcome)

You will need to edit the script to provide your own PeerTube server URL, channel ID (a number), video description, tags etc. Output and errors from the script will be placed in curl-out.txt. Read the API docs to see what numbers you need to use for category, license etc.

Here is upload:

#!/bin/bash

set -e
set -u

USERNAME="$(cat username)"
PASSWORD="$(cat password)"
FILE_PATH="$1"
CHANNEL_ID=MY_CHANNEL_ID_EG_1234
NAME="${FILE_PATH%.*}"
NAME="${NAME#*/}"

API_PATH="https://MY_PEERTUBE_SERVER_URL/api/v1"
## AUTH
client_id=$(curl -s "${API_PATH}/oauth-clients/local" | jq -r ".client_id")
client_secret=$(curl -s "${API_PATH}/oauth-clients/local" | jq -r ".client_secret")
token=$(curl -s "${API_PATH}/users/token" \
  --data client_id="${client_id}" \
  --data client_secret="${client_secret}" \
  --data grant_type=password \
  --data response_type=code \
  --data username="${USERNAME}" \
  --data password="${PASSWORD}" \
  | jq -r ".access_token")

echo "Uploading ${FILE_PATH}"
curl "${API_PATH}/videos/upload" \
  -H "Authorization: Bearer ${token}" \
  --output curl-out.txt \
  --max-time 6000 \
  --form videofile=@"${FILE_PATH}" \
  --form channelId=${CHANNEL_ID} \
  --form name="$NAME" \
  --form category=15 \
  --form licence=7 \
  --form description="MY_VIDEO_DESCRIPTION" \
  --form language=en \
  --form privacy=1 \
  --form tags="TAG1" \
  --form tags="TAG2" \
  --form tags="TAG3" \
  --form tags="TAG4"

Republishing Bartosz Milewski’s Category Theory lectures

Andy Balaam from Andy Balaam&#039;s Blog

Category Theory is an incredibly exciting and challenging area of Maths, that (among other things) can really help us understand what programming is on a fundamental level, and make us better programmers.

By far the best explanation of Category Theory that I have ever seen is a series of videos by Bartosz Milewski on YouTube.

The videos have quite a bit of background noise, and they were not available on PeerTube, so I asked for permission to edit and repost them, and Bartosz generously agreed! The conversation was in the comments section of Category Theory 1.1: Motivation and Philosophy and I reproduce it below.

So, I present these awesome videos, with background noise removed using Audacity, for your enjoyment:

Category Theory by Bartosz Milewski

Permission details:

Andy Balaam: Utterly brilliant lecture series.  Is it available under a free license?  I'd like to try and clean up audio and repost it to PeerTube, if that is permitted. Bartosz Milewski: You have my permission. I consider my lectures public domain.

Andy Balaam: Utterly brilliant lecture series. Is it available under a free license? I’d like to try and clean up audio and repost it to PeerTube, if that is permitted.
Bartosz Milewski: You have my permission. I consider my lectures public domain.